Creating custom pane styles in Drupal 6
Directory structure
Within your theme create a directory for your pane styles, I am just using a directory called styles.
This directory will store all the custom pane styles that we create which will be made available when selecting a custom pane style.
Theme .info file
You need to let Panels know that your theme is providing additional styles within your themes .info file, so add the following:
plugins[panels][styles] = styles
Where the last bit is the directory your styles sit in relative to the base of your theme.
So if you put your styles directory within another directory called panels (i.e. /my_theme/panels/styles) then in your info file you should have:
plugins[panels][styles] = panels/styles
You will need to the visit the themes listing page (/admin/build/themes/select) to get Drupal to refresh it's theme cache.
Base code
To start off with, we will copy some basic code from the panels module.
Navigate to your Panels directory then to the plugins/styles subdirectory. In here you will recognise a few of the file names matching the pane styles. We will focus on the block.inc file (default.inc is a region style, not a pane style).
Copy the block.inc file to your styles directory in your theme and give it a unique filename for your style.
I will just use custom.inc.
Modifying the code
The first thing we need to do is wrap the $plugin array in to a function.
<?php
$plugin = array(
  'title' => t('System block'),
  'description' => t('Display the pane as a system block; this is more restrictive than the default.'),
  'render pane' => 'panels_block_style_render_pane',
  'weight' => -10,
);
?>
Should be changed to:
<?php
function my_theme_custom_panels_styles() {
return array(
'title' => t('Custom'),
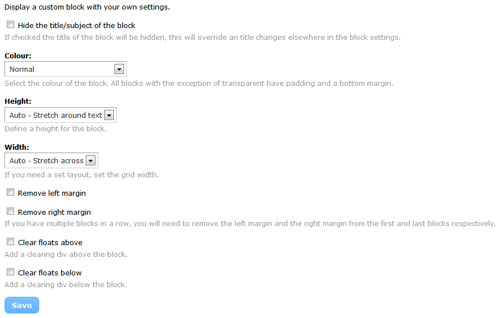
'description' => t('Display a custom block with your own settings.'),
'render pane' => 'my_theme_custom_style_render_pane',
'weight' => -20,
);
}
?>Where the function name consists of THEME_NAME_CUSTOM_STYLE_NAME_panel_styles().
The render pane string is the name of the function (prefixed with theme_) that will be called to display the block.
So the default:
<?php
function theme_panels_block_style_render_pane($content, $pane, $display) {
?>
Should be changed to:
<?php
function theme_my_theme_custom_style_render_pane($content, $pane, $display) {
?>
Now if you go to a panel and try and set a custom pane style, you should see your new style appearing, if you don't you may need to clear your theme registry.
Creating a custom theme function for our custom pane style
In the original function (my_theme_custom_panels_styles()) we can define custom theming options through the use of hook theme.
<?php
function my_theme_custom_panels_styles() {
  return array(
    'title' => t('Custom'),
    'description' => t('Display a custom block with your own settings.'),
    'render pane' => 'my_theme_custom_style_render_pane',
    'weight' => -20,
    'hook theme' => array(
      'panels_custom_block' => array(
        'arguments' => array('block' => NULL),
        'path' => drupal_get_path('theme', 'my_theme') .'/styles/themes',
        'template' => 'panels-custom-block',
      ),
    ),
  );
}
?>
In the first key we define the machine name that will call the theming function. This is what we call when using theme().
For the path we define where the tpl.php file will sit. I have created a subdirectory under the styles directory called themes.
template is the name of the theme file without the .tpl.php extension.
Create the file in this directory which should be called panels-custom-block.tpl.php with the following content:
<?php
<div class="block">
  <?php if ($block->subject): ?>
    <h2 class="block-subject"><?php print $block->subject; ?></h2>
  <?php endif;?>

  <div class="block-content content">
    <?php print $block->content; ?>
  </div>
</div>
?>
In the theme_my_theme_custom_style_render_pane() function we currently have:
<?php
function theme_my_theme_custom_style_render_pane($content, $pane, $display) {
if (empty($content->content)) {
return;
}
if (!empty(
$content->title)) {
$content->subject = $content->title;
}
$content->region = $pane->panel;
if (!isset($content->module)) {
$content->module = $content->type;
}
if (!isset($content->delta)) {
$content->delta = $content->subtype;
}
// If using per pane classes, $block->css_class will need to be added in your
// preprocess or template, along with any other Panels specific field you
// might want to utilize.
return theme('block', $content);
}
?>At the end change theme('block', $content) to theme('panels_custom_block', $content).
If you haven't already, set one of your panes to use the new pane style and view the page. You should hopefully see the changes to your pane.
Adding a settings form
Adding a settings form is very simple and uses the form API which makes it extremely easy for anyone used to developing in Drupal.
All we need to do is add an extra line defining our settings form function name:
<?php
function my_theme_custom_panels_styles() {
  return array(
    'title' => t('Custom'),
    'description' => t('Display a custom block with your own settings.'),
    'render pane' => 'my_theme_custom_style_render_pane',
    'pane settings form' => 'my_theme_custom_style_form',
    'weight' => -20,
    'hook theme' => array(
      'panels_custom_block' => array(
        'arguments' => array('block' => NULL),
        'path' => drupal_get_path('theme', 'my_theme') .'/styles/themes',
        'template' => 'panels-custom-block',
      ),
    ),
  );
}
?>
We can create our settings form:
<?php
function tester_custom_style_form($settings) {
  $form['display_random_text'] = array(
    '#type' => 'checkbox',
    '#title' => t('Display a bit of random text at the top of the block'),
    '#default_value' => (isset($settings['display_random_text'])) ? $settings['display_random_text'] : '',
    '#description' => t('Checking this box will display a random bit of text at the very top of our block.'),
  );
  return $form;
}
?>
We don't need to define a submit button as this is handled for us.
In your theme_my_theme_custom_style_render_pane() function you can access the saved settings through $pane->style['settings'] as an array of items.
So before the theme() function is called add some code to add any variables you need to the $content object.
<?php
  if ($pane->style['settings']['display_random_text'] != 1) {
    $content->random = TRUE;
  }
?>
Then in your .tpl.php file, you can use the variables.
And that is it. You now have a fully customisable pane style which you can give users full control of. The good thing with this is you can add set CSS classes by using a form select or checkboxes rather than relying on users remembering to set the CSS classes through the default pane settings screen which I have done below by providing all the different potential options that can be used for pane classes in an easy to use form.


Comments
Anonymous
Fri, 2011-11-04 17:00
Permalink
Thank you for this tutorial.
Thank you for this tutorial. I have been wondering how to do this for a long time.
Panels is awesome.
Anonymous
Tue, 2012-05-01 22:27
Permalink
nice!
thanks
Anna Harris
Fri, 2012-08-24 11:28
Permalink
Thanks for the code. Can it
Thanks for the code. Can it possible to create in Druple 8?
james
Wed, 2012-08-29 12:55
Permalink
I haven't used Drupal 8
I haven't used Drupal 8 (other than a brief look) but I am sure you will be able to do this although there may well be some changes to the code required.
cesabal
Tue, 2013-06-25 22:55
Permalink
Customize this page button missing
Perfect, this work for me, but the "customize this page" button is missing now, i'm use the ipe module, but with this plugin the button has disappeared.
james
Wed, 2013-06-26 11:03
Permalink
Can't help you with that as I
Can't help you with that as I never use IPE. Does disabling/removing the plugin cause the "customize this page" button to come back?