Displaying nodes as blocks using Block API
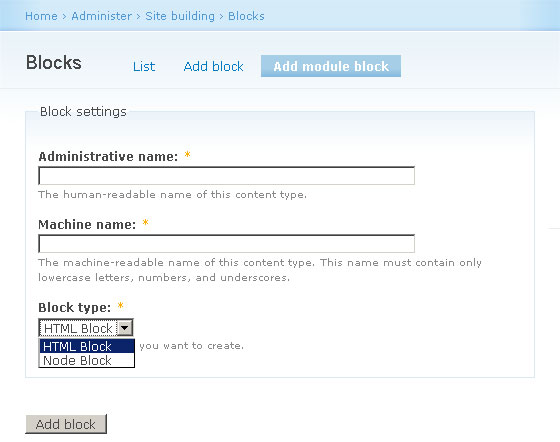
Recently I wrote a new module called Block API which allows other modules writers to create modules to develop templates for users to easily create new blocks rather than relying on copying and pasting HTML.
The example module included copies the functionality of the core block module. Below I will show how to use Block API to display a specific node as a block with further configuration options available to the user to choose from.
First off, if you just want to download this module to use, you can do so by clicking here.
As with any other module, create an info file using whatever module name you want. The module name I will be using is node_block.
<?php
name = Node Block
description = Add new blocks by using pre-existing nodes.
core = 6.x
dependencies[] = block_api
?>
In your .module file, we need to first set up the hook to allow Block API to do it's job. So our first function will be the following:
<?php
function node_block_block($op = 'list', $delta = 0, $edit = array()) {
  $function = 'block_api_block_'. $op;
  return $function('node_block', $delta, $edit);
}
?>
This passes all the hook_block calls through the Block API which then allows users to select your block types through a single interface.

Next, we need to define our block types that we will provide users. To do this we use hook_block_api_info().
<?php
function node_block_block_api_info() {
  $types['node_block'] = array(
    'title' => t('Node Block'),
    'description' => t('Create a block from a pre-existing node.'),
    'storage' => BLOCK_API_STORAGE_DATABASE,
  );
  return $types;
}
?>
This is very simple, and defines the block type.
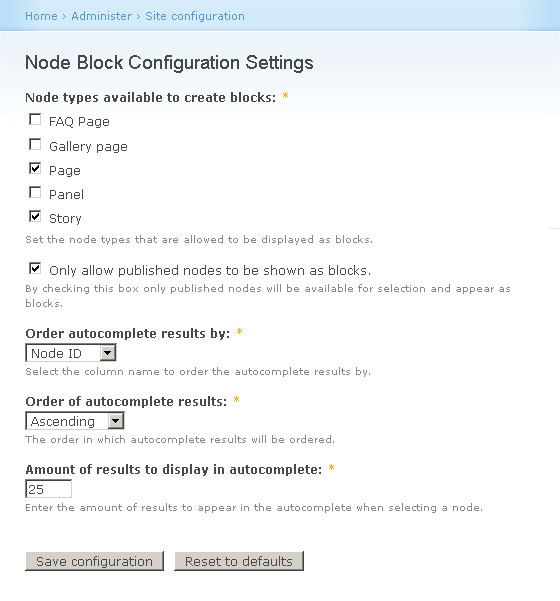
For this module we are going to allow the user to select a node to display and choose whether to display the full node or just the teaser. As well as this, we are going to give the administrator the choice of which node types are available to the user to chose nodes from as well as selecting whether users can use unpublished nodes or not.
First we will define the administration form to chose which content types are available. To do this, we need to use hook_menu() to define our menu item pointing to our form.
<?php
function node_block_menu() {
  $items['admin/settings/node_block'] = array(
    'access callback' => 'user_access',
    'access arguments' => array('administer blocks'),
    'page callback' => 'drupal_get_form',
    'page arguments' => array('node_block_admin_form'),
    'title' => 'Node Block Configuration Settings',
    'description' => 'Set the configuration options for Node Blocks.',
    'type' => MENU_NORMAL_ITEM,
  );
  return $items;
}
?>
There is nothing complex here, just a standard menu item. We now have to create the form node_block_admin_form().
<?php
function node_block_admin_form() {
  $types = node_get_types('names');
  $form['node_block_content_types'] = array(
    '#type' => 'checkboxes',
    '#title' => t('Node types available to create blocks'),
    '#description' => t('Set the node types that are allowed to be displayed as blocks.'),
    '#required' => TRUE,
    '#options' => $types,
    '#default_value' => variable_get('node_block_content_types', ''),
  );
  $form['node_block_published_only'] = array(
    '#type' => 'checkbox',
    '#title' => t('Only allow published nodes to be shown as blocks.'),
    '#description' => t('By checking this box only published nodes will be available for selection and appear as blocks.'),
    '#default_value' => variable_get('node_block_published_only', 1),
  );
  $form['node_block_sql_order'] = array(
    '#type' => 'select',
    '#title' => t('Order autocomplete results by'),
    '#description' => t('Select the column name to order the autocomplete results by.'),
    '#default_value' => variable_get('node_block_sql_order', 'nid'),
    '#required' => TRUE,
    '#options' => array('nid' => t('Node ID'), 'title' => t('Node title'), 'type' => t('Node type')),
  );
  $form['node_block_sql_sort'] = array(
    '#type' => 'select',
    '#title' => t('Order of autocomplete results'),
    '#description' => t('The order in which autocomplete results will be ordered.'),
    '#default_value' => variable_get('node_block_sql_sort', 'ASC'),
    '#options' => array('ASC' => t('Ascending'), 'DESC' => t('Descending')),
    '#required' => TRUE,
  );
  $form['node_block_autocomplete_limit'] = array(
    '#type' => 'textfield',
    '#title' => t('Amount of results to display in autocomplete'),
    '#description' => t('Enter the amount of results to appear in the autocomplete when selecting a node.'),
    '#required' => TRUE,
    '#default_value' => variable_get('node_block_autocomplete_limit', 25),
    '#size' => 5,
  );
  return system_settings_form($form);
}
?>
To get a list of nodes types, you can run your own custom SQL query, but it is a lot easier to use Drupal's built in node_get_types() function. If you pass along 'types' as the first argument, you will get a lot more information, but all we need is the node type machine name and the display name. node_get_types('names') does exactly this with an associative array with the key being the machine name and the value being the display name.
The rest of the form is very simple, giving the administrator full control over the ordering of the autocomplete which users will select their node from.

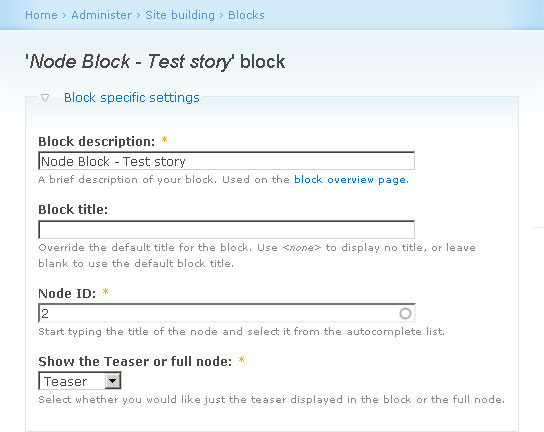
We now have our admin form set up, so now it is time to create the configuration form for the users when adding a new block. Again we hook in to the Block API, this time using hook_block_api_form($config, $edit).
<?php
function node_block_block_api_form($config, $edit) {
  if ($config['block_type'] == 'node_block') {
    $form['nid'] = array(
      '#type' => 'textfield',
      '#title' => t('Node ID'),
      '#description' => t('Start typing the title of the node and select it from the autocomplete list.'),
      '#required' => TRUE,
      '#default_value' => $config['settings']['nid'],
      '#autocomplete_path' => 'js/node_block/autocomplete',
    );
    $form['teaser'] = array(
      '#type' => 'select',
      '#title' => t('Show the Teaser or full node'),
      '#description' => t('Select whether you would like just the teaser displayed in the block or the full node.'),
      '#default_value' => $config['settings']['teaser'],
      '#required' => TRUE,
      '#options' => array(0 => t('Full node'), 1 => t('Teaser')),
    );
  }
  return $form;
}
?>
Here we give the user two options. The first is an autocomplete field to select the node and the second being a simple checkbox allowing the user to select whether they want to show the teaser of the node or the full node.

To get the autocomplete working, we need to set up our autocomplete menu item and function to run the search query.
In your existing hook_menu(), add the following to create a menu callback for our autocomplete textfield.
<?php
  $items['js/node_block/autocomplete'] = array(
    'page callback' => 'node_block_js_autocomplete',
    'access callback' => TRUE,
    'type' => MENU_CALLBACK,
  );
?>
A very simple callback, no need for a title or description and access is open to everyone, although you could limit it to the users who are able to create blocks.
Next we need to set up the SQL query that will fetch the nodes based on the users input.
<?php
function node_block_js_autocomplete() {
  $str = $_POST['nid'];
  $sql = "SELECT nid, title FROM {node} WHERE LOWER(title) LIKE LOWER('%%%s%%')";
  foreach (variable_get('node_block_content_types', '') as $type => $value) {
    if (strlen($value) > 1) $types[] = '"'. $type .'"';
  }
  $sql .= " AND type IN (". implode(", ", $types) .")";
  if (variable_get('node_block_published_only', 1) == 1) {
    $sql .= " AND status = 1";
  }
  $sql .= " ORDER BY ". variable_get('node_block_sql_order', 'nid') ." ". variable_get('node_block_sql_sort', 'ASC');
  $sql .= " LIMIT 0, ". variable_get('node_block_autocomplete_limit', 25);
  $query = db_query($sql, filter_xss($str));
  $results = array();
  while ($data = db_fetch_object($query)) {
    $results[$data->nid] = check_plain($data->title);
  }
  print drupal_to_js($results);
}
?>
We get the users current inputted text from $_POST and set up the basic SQL. As we gave the administrator the chance to limit the options available, we must now apply those filters. First we make sure the query only gets results for the right content types, then check for only published nodes if defined by the administrator. The next few lines are for the autocomplete ordering and limiting the amount of results.
We now have our two admin forms configured, the only bit remaining is showing the block on the page. This is done by using hook_block_api_view().
<?php
function node_block_block_api_view($config) {
  if ($config['block_type'] == 'node_block') {
    $node = node_load($config['settings']['nid']);
    if ($node->status == 0 && variable_get('node_block_published_only', 1) == 1) return FALSE;
    $output = node_view($node, $config['settings']['teaser'] == 1 ? TRUE : FALSE);
  }
  return array('content' => $output);
}
?>
First, we load the node using the NID saved from our form by Block API. It is probably best to add some code in to make sure that a node ID has been saved either at view stage or when saving the block.
Next we make sure the node is not unpublished if the administrator has defined that only published nodes can be shown as blocks.
Then we use the function node_view() to display the node. The second argument is the $teaser argument. If TRUE it will display the teaser of the node, otherwise the full node will be published.
You may also want to hide the node block if you are viewing the node page itself, so adding a line after the status line such as:
<?php
if (arg(0) == 'node' && arg(1) == $config['settings']['nid']) return FALSE;
?>
And that is it. You will now be able to create blocks


Comments
Anonymous
Thu, 2011-08-25 20:25
Permalink
I got this error...How can i fix it..?
Fatal error: Call to undefined function block_api_block_list() in C:\xampp\htdocs\test\sites\all\modules\node_block\node_block.module on line 4
james
Thu, 2011-08-25 20:59
Permalink
This code is for an old
This code is for an old version of the Block API.
chris
Tue, 2012-08-28 08:56
Permalink
Your block api has helped me a ton thanks
any suggestions on of giving the same functionality to default blocks like navigation / powered by drupal block etc
james
Wed, 2012-08-29 12:59
Permalink
Block API is old. If you are
Block API is old. If you are using Drupal 7 check out http://drupal.org/project/bean instead.