[Tutorial] Create a professional navigation bar in Photoshop
This tutorial with guide you through how to make a professional looking navigation bar for your site. This tutorials takes in to account that you have a reasonable knowledge of Photoshop.
The result will be like the following:
![]()
Step 1
Make a new document. For this tutorial I am using 800x40 with a resolution of 72 pixels/inch with Colour Mode set to RGB Colour 8 bit.
Step 2
Make a box that takes up most of the area, but leave around 5 pixels space at the bottom and fill with a gradient of #FFFFFF to #DDDDDD from top to bottom of the selection to make this:
![]()
Step 3
Now out of the 5 pixels you left select the middle 3 using the single line marquee tool or by using the rectangular marquee tool.

Step 4
Create a new layer and fill this with #006699 and set the opacity of this layer to 50%.
![]()
Step 5
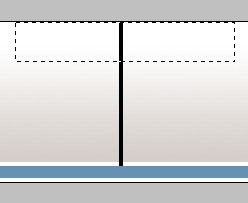
Now we have the background for our navigation bar. Select the vertical single line marquee tool and draw a line anywhere vertically down your nav bar. Create a new layer and fill it with #000000. Then delete everything on and below the blue bar to get this.

Step 6
Get the rectangular marquee tool and make a small selection at the top like this:

Step 7
Go to Select » Feather » Set to 10px then press OK. Press the Delete key around 10 times and set the layers opacity to 50%.
Step 8
Add all your text in for your links and duplicate the spacers to go in between the links.
![]()
Step 9
Select the vertical single line marquee tool again and click on one of the spacers to select the whole line.
![]()
Step 10
Now click Layer 2 which is your blue bar and press Delete then move the bar 1 pixel to the left then delete then 2 pixels to the right then press delete.
![]()
Step 11
You now have a complete navigation bar.
Note: This tutorial was originally posted on Skeletorscorpse titled Professional Navigation Bar on 14 January 2006.


Comments
Coach
Thu, 2009-11-26 12:50
Permalink
This is wonderful. Thanks for
This is wonderful. Thanks for sharing. I will give a try for sure.
Cheers,