Create an album based image gallery in Drupal 7 using fields and views
This is a follow up tutorial on the popular Create an album based image gallery in Drupal 6 using CCK and views but for Drupal 7. The tutorial will assume that you have Drupal 7 already installed and ready for use. The following contrib modules are required:
I personally prefer Colorbox to some of the other lightbox modules, but feel free to use whichever one you want, they should all work in the same way. An alternative can be found in Shadowbox. Lightbox2 doesn't have a D7 release at the time of writing and Thickbox has been discontinued, with the maintainer now working on Colorbox.
The following list is the absolute minimum required to get the gallery functionality, if you don't have one of these modules installed you won't be able to complete the tutorial.
- Views
- Ctools
- Colorbox
- Fields
- Fields UI
- Field SQL storage
- File
- Image
Once you have confirmed all these modules are installed you can continue.
Setting up the content type
The result of this tutorial will be a host of gallery nodes which can include either a predefined number or no limit of images. So we will need to create a content type for these galleries.
Go to Structure then Content types and click the Add content type link.
For the Name, enter Gallery.
Enter a description and set any of the additional settings. I am going to leave them all at default other than Promoted to front page, which I am going to uncheck (I will show you why later on).
Click Save and add fields. The first thing I am going to do is remove the Body as I won't be using it.
Under Add new field, enter Images in the label box and images in the name box. Under Field, select Image and under Widget select Image. Press Save.
On the next screen just press Save field settings.
Tick the Required field checkbox and enter any restrictions you want to place on image resolution/size. Change Number of values to the maximum number of images you want to appear in each individual gallery, I am going to set this to unlimited. Click Save settings.
Select the Manage display tab. For Label select <Hidden> and for Format select Colorbox. On the right hand side, click on the cog to bring up the settings for the image field. For Node image style select thumbnail or medium. Leave Colorbox image style set to None (original image). Click Save.
We now have our gallery content type set up. At this point you can set up any permissions you want to give to users so they can create galleries or any workflows that you need to set up or configure.
If possible, create a few test galleries with a few images in each. Doing so will help see what each change in the Views module makes.
Creating the galleries page
Go to Structure then Views and click Add new view.
The Views interface has changed slightly (for the better in my opinion) from D6 which does a fair amount of the work for us. Enter in a name for the View and a description if you wish.
In the first section, select Content of type Gallery sorted by Newest first.

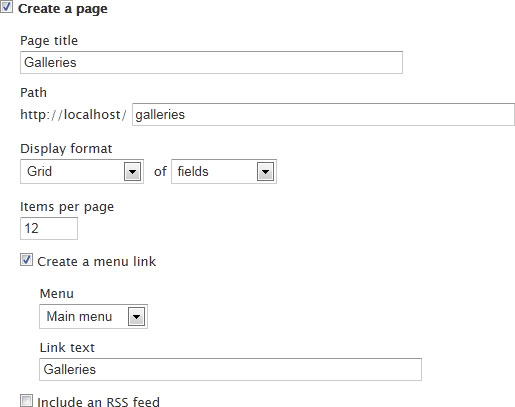
In the next section enter the information like below. You can change most of it, but keep the Display format set to Grid of Fields.
Click Continue and edit.
Under Format, where it says Grid, click the link that says Settings. Change the Number of columns to 3. Click Apply.
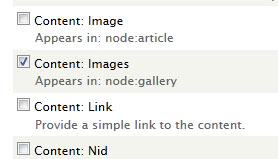
In the Fields section, click the Add button. Click the checkbox next to Content: Images then click Add and configure fields.
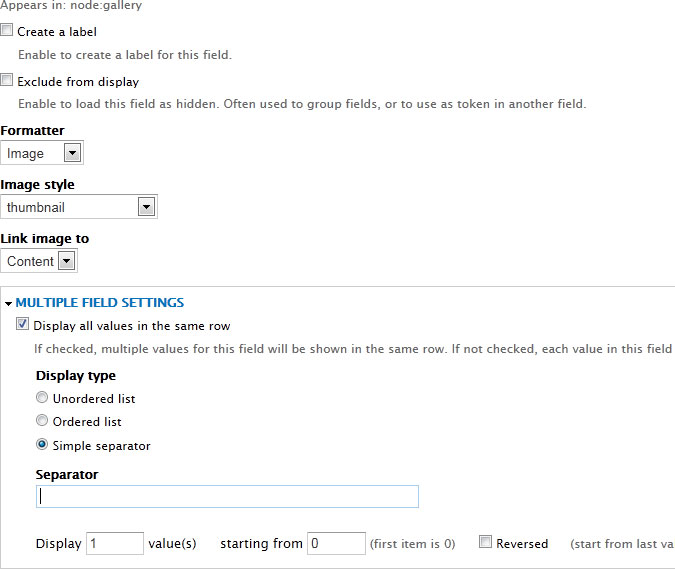
Uncheck the Create a label box and make sure the Formatter is set to Image and Image style is set to thumbnail. For Link image to, set to Content.
Under Multiple field settings make sure the box to Display all values in the same row is checked and the Display type is set to Simple separator, then delete the text in the Separator field. Finally set the Display value(s) to 1.
Click Apply.
At the bottom of the window the preview should now be showing you what your gallery page will look like.
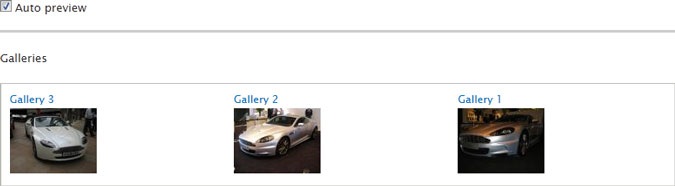
Click Save at the top right to save the View. Then go the gallery page.
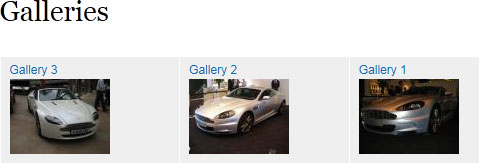
Clicking on one of the images or the gallery title will take you through to the node with the full gallery of images which will open in Colorbox modal window.
Additional changes
Changing the HTML of the galleries page
The basic semantics that come out of Views aren't always the best but you have control to change some of this within Views itself. For Drupal 6, I found the Semantic Views module invaluable, hopefully a full D7 release will come out soon.
In the View edit screen, under Fields click Content: Title.
Under Style settings, check the box for Wrap field in HTML and set the HTML element to something which fits in with the flow of your page.
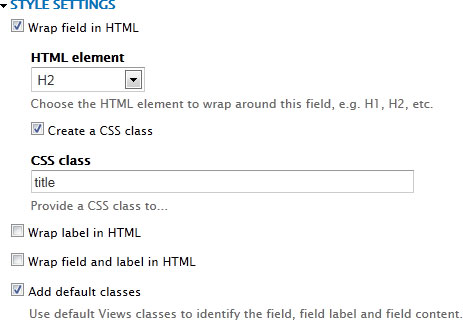
Click Apply and save the View.
Have featured galleries appear at the top of the page
You may have some galleries which are to always appear at the top, there are two ways you can do this within Views.
1) Sticky/Promoted content
You can set the ordering of the view so that Sticky/Promoted content appears first. This is fine if you want the display of these galleries to be the same.
2) Views Attachments
If you want to give more focus to the featured galleries, we can create a Views attachment which we can make appear before the rest of the View which will highlight the selected galleries.
In the edit screen of your view, at the very top under the text Displays click Add then select Attachment.
Under Title, click the link and change the settings so it looks like the following:
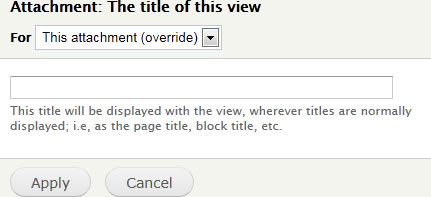
Remember to change the For to This attachment (override) so that we don't override the basic page's settings. Click Apply.
Now under Fields click Content: Images. Again change For to This attachment (override). Change the Image style from thumbnail to medium.
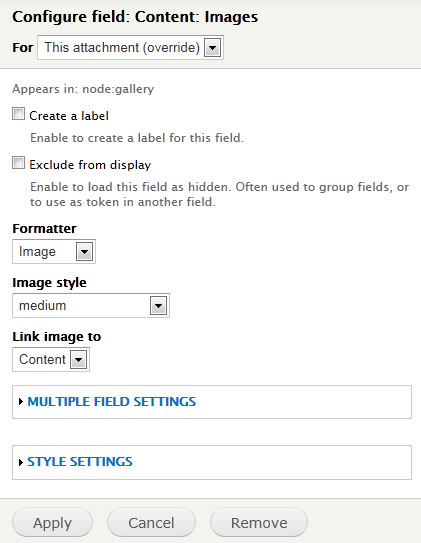
Click Apply.
Next to Filter criteria click the Add button. Select Content: Promoted to front page and press Add and configure filter criteria.
Once again change For to This attachment (override) and set Promoted to front page to Yes. Click Apply. You may need to go back in and set this to Yes again, I think there is a bug in Views when creating a new filter with override selected.
Under Attachment settings, Attach to click Not defined. Tick Page and press Apply.
Under Displays, click Page. That little bug I briefed upon means that the filter has also appeared on our main page (it shouldn't of). Select it and either remove it if you don't mind the featured galleries appearing twice on the page, otherwise set to No and press Apply.
Save the View and go to the galleries page.
Go in to one of the galleries, click Edit and tick the box next to Promote to front page.
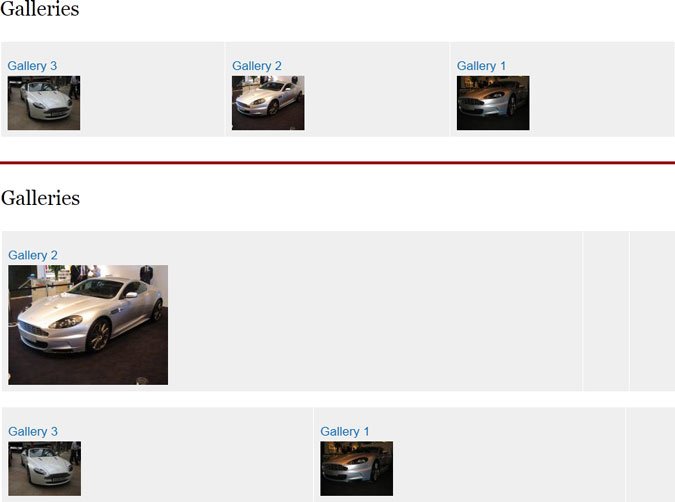
Now go back to your galleries page and you should have two lots of galleries with your promoted gallery appearing at the top with the other galleries underneath with smaller thumbnails. The image below shows what you should have had before promoting the gallery (above the red line) then what it should look like afterwards (below the red line).
All cosmetic changes can be made through the CSS in your theme.
Downloadable Feature
You can download a feature of this from here.
Node view
Some people have mentioned that the node view once you have done this just displays a single column of images and wish to make it a grid like the gallery page. I have written a new tutorial about using Panels and Views to override the node template.


Comments
Oli
Tue, 2012-04-17 12:14
Permalink
Multiple Field Settings option
i think i have, sorry i am a bit of a noob when it comes to this, where would i go to check?
james
Tue, 2012-04-17 12:49
Permalink
Go to Structure then Content
Go to Structure then Content types, click Manage fields next to your content type. Click Edit next to your image field. Setting is on that page.
Oli
Tue, 2012-04-17 13:00
Permalink
Multiple Field Settings option
ahhhh yer it was set to 1, cheers works great!
Hiral Vyas
Fri, 2012-05-11 10:36
Permalink
need some customization
Hi team,
I need little bit customization. In image gallery if I click on cover image, it will either open all photos inside that gallery or I can set to open single (cover photo) in popup.
But my requirement is that, when I click on cover photo it should open my all photos in popup with next previous navigation buttons.
Please help ASAP
Thanks
Hiral
james
Fri, 2012-05-11 12:23
Permalink
Other people have done it. I
Other people have done it. I think you need to load up all the images per row then use CSS to all but the first image.
TL
Wed, 2012-06-13 12:19
Permalink
Multiple image uploads or a better way to do it
hey thx but its very tedious to upload large images with the image widget is there a better way to do this ?
james
Wed, 2012-06-13 12:33
Permalink
I think http://drupal.org
I think http://drupal.org/project/plupload is the successor to fupload.
Leif Miltenberger
Fri, 2012-06-15 22:49
Permalink
Excellent tutorial - thanks
Excellent tutorial - thanks for putting this together!
Kat
Wed, 2012-07-04 12:32
Permalink
The album also shows the pictures of the article
thanks for the great tutorial. I get this to work, but I have problem of the title. How do I correct that?
nirmesh
Sun, 2012-07-29 11:51
Permalink
unable to see lightbox effect in my gallery
Hi,
I have followed each step and i got the gallery working but i am unable to see any effects like i suppose to get after choosing colorbox. Can you please guide me.
Mike Neyens
Mon, 2012-07-30 09:17
Permalink
Finally a clear tutorial for
Finally a clear tutorial for drupal 7. Bookmarked!
Alex
Tue, 2012-08-28 17:00
Permalink
Image viewer
how to configure fields and views to create the same image switcher as amazon samples below?
http://www.amazon.co.uk/gp/product/images/B000TER4HO/
http://www.amazon.co.uk/gp/product/images/B00126INHI/
james
Wed, 2012-08-29 12:58
Permalink
You would be better off using
You would be better off using a slideshow plugin and feeding the images in to that.
Rich
Fri, 2012-08-24 17:48
Permalink
Not working for me
I follow these instructions, however it doesn't seem to be working as I expected it to. Once I set up the view with the setting above and hit the page I see my galleries with the first image in the gallery as default. But when I click a thumbnail I am taken to the gallery content page and only then I when I click, I see Colorbox.
What I was hoping would happen is to go right into the Colorbox full view from the Views Page, not the gallery content page. I hope this makes sense. Please help.
james
Wed, 2012-08-29 12:57
Permalink
What you are experiencing is
What you are experiencing is what the expected outcome of this tutorial is. You can do what you want, as others have done it, although I haven't personally done it myself, nor have I looked in to how to do it.
I would have thought that you need to show all the images (i.e. not just the first image) but group them then use CSS to hide all but the first image.
aVo
Thu, 2012-11-01 15:30
Permalink
Did you get a solution to this
Hi,
I've been trying to achieve this same thing... without success so far.
Did you get a solution?
I've tried grouping and using css as James suggests, but can't see how I can make css show only the first image ( I know css and Drupal/Views well ).
I'd appreciate any pointers.
Thanks.
james
Thu, 2012-11-01 16:05
Permalink
You need to leave the
You need to leave the imagefield set to show all images in a single row, instead of setting 1 image, change it to 'all' and change the field formatter to 'Lightbox/Colorbox' depending on what formatter you have set up.
In your CSS, I think the first image will have a class of .first so you can hide all the images, then display the image.first with display or display-block. If it doesn't have the class then you will be able to use the first child CSS property.
aVo
Wed, 2012-11-07 12:03
Permalink
Thanks James, I appreciate
Thanks James, I appreciate your taking the time, both for the excellent gallery tut, and to guide me here.
I'd got as far as you have suggested.
However, the images themselves have no css classes at all, and I see no suitable child properties to use.
The a tags that wrap the images all have the same classes leaving nothing to distinguish the first image at all, as far as I can see.
Am I missing something?
Is there a way to add classes that I have yet to discover?
Thanks again.
james
Wed, 2012-11-07 14:33
Permalink
I guess you should be able to
I guess you should be able to target the parent div/td then hide all of the anchor tags then show the first one.
.wrapper_div a {display: none;
}
.wrapper_div a:first-child {

display: block;

}
I haven't got a demo site set up to test it.
Anonymous
Thu, 2012-11-08 09:23
Permalink
Yes, that makes sense and
Yes, that makes sense and would be my approach also.
However, there is no css class available to distinguish the first image from the others.
Unless I am still missing something here?
Perhaps there is a way to include suitable css that I have not found?
You can see a live version of this here;
http://charlesthornephotography.co.uk/galleries
Please note that the client requested that I make the site live even though the gallery is not yet as required. There is only one image in place but the css/classes are the same as my local install where there are multiple images.
Thanks again.
james
Thu, 2012-11-08 11:15
Permalink
You don't need a class if you
You don't need a class if you are using the :first-child pseudo selector.
.wrapper_div a:first-child {display: block;
}
Anonymous
Thu, 2012-11-08 13:49
Permalink
Ahhh... wonderful.
Ahhh... wonderful.
I learned something new!
Ace.
Thanks James, that all works just as I hoped.
Where's the 'buy me a beer' button... :)
Einburger
Fri, 2012-08-31 09:31
Permalink
Alternative to node_gallery
Thanks for nice tutorial. We try to use it here instead of node_gallery: http://www.deutsch-werden.de/galleries
There are not much gallery alternatives for d7 yet.
mario
Sat, 2012-10-20 21:25
Permalink
only one gallery
Hi, muchas gracias... great tutorial.
I am a newbie in droopal and I don't know how to generate one only gallery, not several galleries. How can I do that?
Mario
Sat, 2012-10-20 21:50
Permalink
man is there a way to do only
man is there a way to do only one gallery? like in this tutorial: http://jamestombs.co.uk/2009-03-18/create-a-simple-image-gallery-in-drup...
tnx
Cutero
Fri, 2013-01-25 14:51
Permalink
Thanks, this helped me a lot!
Thanks, this helped me a lot! greetings from Colombia James.
Taher
Mon, 2013-03-11 05:37
Permalink
The Best Of All Tutorials
James...Dear Thanx For the tutorial, you made the task of creating multiple image gallery so easy..
I hav followed all the steps as mentioned above but was not able to remove the comma separator from between the images.....as of i am not able to see the Display type option in Multiple Field Settings sections.
Please help on this
james
Mon, 2013-03-11 09:20
Permalink
If you can't see it, it may
If you can't see it, it may be down to having jquery_update installed which breaks parts of the Views UI.
Taher
Mon, 2013-03-11 17:37
Permalink
Thanx James......u r jus
Thanx James......u r jus fantastic....i appreciate your help and the knowledge towards drupal....
thanx a lot
can you also advice me with this prob also
m using the lightbox2 instead colorbox.
therefore using the format 'lightbox2:lightbox: thumbnail->original'
but when i click on the image it displays only the first image of the album in the lightbox and the slideshow ends when i click again on the image.
All the images of the album can be seen in the lightbox only when i go to the album page.
I had also tried to configure the lightbox but cant figure it out...
thanx in advance..
james
Mon, 2013-03-11 20:44
Permalink
That is the way the tutorial
That is the way the tutorial is written, although on the listing page the tutorial says to use thumbnail (non lightbox) linked to content.
Others have done what you are talking about but I haven't.
ibrahim
Mon, 2013-03-18 23:05
Permalink
select promoted gallery image
hi james, thanks for tutorial. i wonder about promoted gallery image. in your tutorial first (1) image taken to promoted image for gallery. how can i select different location different galleries? because if i upload image may be the image which i want to promote to front can be any index except 1.
how can i insert a check box which with i can select the promoted gallery image?
thans from now for your reply.
james
Tue, 2013-03-19 12:08
Permalink
Easiest option would be to
Easiest option would be to add an additional imagefield to your content type which would be the "featured image". Then use that image for your view.
ibrahim
Tue, 2013-03-19 20:30
Permalink
a new issue about taxonomy+views gallery
thanks for reply james. recently i have seen an album+gallery image view in http://www.hopkinsco.com/portfolio (album), http://www.hopkinsco.com/portfolio/colonial (album galleries). i think there is taxonomy and views in this sample. but how can do this in your sample. in your sample there is gallery but not album.
an another question, the gallery bsckgroud color is gray but i want white. how can i do?
thanks all reply.
james
Wed, 2013-03-20 09:17
Permalink
The colonial page is the
The colonial page is the gallery type page that this tutorial covers. The portfolio bit is just a grid of taxonomy items.
ibrahim
Fri, 2013-03-22 12:09
Permalink
subgalleries
hi james, i bother you again with a question. i wonder about gallery container. we can make subgalleries in your example (again thanks for tutorial) but i want related subgallery container like http://www.hopkinsco.com/portfolio. we can make the structure http://www.hopkinsco.com/portfolio/colonial with your tutorial but how can make container with taxonomy or other?
again thanks.
james
Mon, 2013-03-25 09:44
Permalink
I imagine the way they have
I imagine the way they have done it is to add an imagefield to the taxonomy which has that pencil style image. Then the view would be a grid of taxonomy terms within that vocabulary which then clicks through to the taxonomy page which has the view of nodes with that taxonomy term.
Anonymous
Mon, 2013-04-29 15:07
Permalink
hi james again. i add two
hi james again. i add two images field (album images and tease image (we select it between uploaded image)). when i click teaser image i want to go album's firt image. but i can't pass to album photos from teaser image with views. how can i do?
ibrahim
Thu, 2013-05-02 16:49
Permalink
hi james again. i add two
hi james again. i add two images field (album images and tease image (we select it between uploaded image)). when i click teaser image i want to go album's firt image with colorbox popup. but i can't pass to album photos from teaser image with views. how can i do?
james
Fri, 2013-05-03 06:25
Permalink
I think you would need to add
I think you would need to add a hidden field in your view for the path of first album image, then rewrite the tease image to link to that path. Then you would need to add all the other album images excluding the first image (otherwise you will get it twice in the colourbox). Then hide those links using CSS.
ibrahim
Mon, 2013-05-06 13:40
Permalink
i finally understood. thanks
i finally understood. thanks for very useful reply James.
Anonymous
Fri, 2013-04-26 06:56
Permalink
Customize the data
Hi,
Here if I want to put some other data i mean EX:images of the user from the database. So do we have a facility to customize the data that is getting displayed, by using the same layout and design.
james
Fri, 2013-04-26 08:12
Permalink
Haven't got a clue what you
Haven't got a clue what you are asking. Do you want to put extra items/images within the grid?
If so, there are various jQuery plugins which allow you to insert content in to certain areas or you could create and edit the views template file for that particular view to randomly insert items in to your results.
MALIK RIZWAN ALI
Wed, 2013-07-03 16:38
Permalink
THANKS FOR DRUPAL "GALLERY VIEW"
I LIKE THIS TUTORIAL VERY MUCH AND APRICIATE YOU. IT IS VERY MUCH USEFUL.
I WANT TO MORE, IF YOU CAN, IN GALLERIES, IMAGE CAN BE DISPLAYED IN DIFFERENT RESOLUTIONS, OR IMAGE STYLES. IS IT POSSIBLE? CAN YOU GIDE ME MORE.
THANKING IN ANTICIPATION,
MALIK RIZWAN ALI malikrizwanali34@yahoo.com
Deodato
Tue, 2015-05-05 12:57
Permalink
Teaser view
Hi there,
I know i'm commenting on an old post but i have a question regarding teaser view.
when i enable teaser view all my images are shown in the teaser view.
How can i limit the nr of images shown in teaser view??
kind regards.
Pages