Create a simple image gallery in Drupal 6 using CCK and Views
This tutorial will guide you through how to create a simple gallery within Drupal 6 using CCK, Views and a few more custom modules.
This tutorial was written with the following versions of Drupal and modules:
- Drupal 6.10
- CCK (Content Construction Kit) 6.x-2.1 (6.x-2.2)
- Views 6.x-2.3 (6.x-2.5)
- Filefield 6.x-3.0-beta1 (6.x-3.0-rc1)
- Imagefield 6.x-3.0-beta1 (6.x-3.0-rc1)
- ImageAPI 6.x-1.5 (6.x-1.6)
- Imagecache 6.x-2.0-beta8 (6.x-2.0-beta9)
- Lightbox2 6.x-1.9
Update: Modules have been updated to the latest versions as of 20 April 2009, version numbers are in brackets after the links above.
Installation
Install Drupal as you normally would and extract each of the modules to the /sites/all/modules directory. You should have a directory structure like the following:
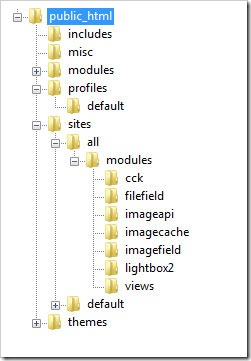
When logged in go to /admin/build/modules and enable the following modules:
- Content
- Filefield
- Imagefield
- ImageAPI
- ImageAPI GD2 (unless your server is configured for Imagemagick, then enable the ImageMagick module instead)
- ImageCache
- ImageCache UI
- Lightbox
- Views
- Views UI
Once you have ticked the modules, press Save configuration.
Imagecache
We need to create 2 presets for our images, one will be a thumbnail to show in the gallery and a second to show within the lightbox.
Navigate to /admin/build/imagecache and click Add new preset.
Set the preset Namespace to thumbnail. Click Add Scale and Crop, set the width to 180 and the height to 120.
Then create a new imagecache preset with the name lightbox. This time select Add Scale and set the width to 800 and the height to 600.
CCK Imagefield
First we will set up a new content type for our images which we will call Image. Navigate to /admin/content/types and click Add content type.
Set the name to Image and the type to image. You may enter a description if you wish.
Under Submission form settings, delete the text from the Body field.
Depending on how you want to set up the gallery, you can change the Workflow settings so that images aren’t automatically added but are added to an approval list, for this tutorial we will make all images published, so untick Promoted to frontpage and leave Published ticked.
Under Comment settings, set comments to disabled.
Save the content type.
Next to the Image content type click manage fields. In the Add New field area, set the label to Image and the field name to image (to make it field_image), for the Type of data to store, select File then for Form element select Image. Press Save.
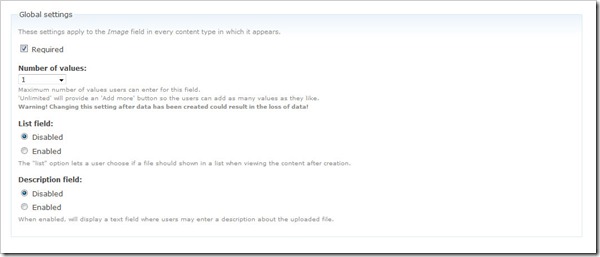
Under Global settings, tick the Required box and set the Number of values to 1. Leave the List field and Description field to Disabled.
Then press the Save field settings button.
Now click the Display fields tab at the top of the page.
Set the Label to Hidden and set both the Teaser and Full node to Lightbox2: thumbnail->lightbox.
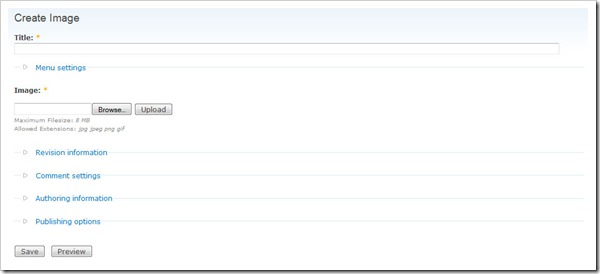
Now under /node/add/image we can add an image to go in to our gallery.
For now create 3 or 4 images.
Under /admin/content/node you should now have some nodes.
Now we will set up a view to display these nodes in a gallery.
Views
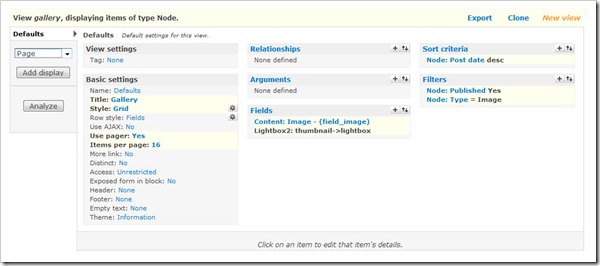
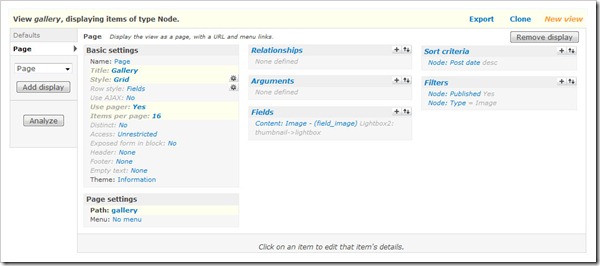
Navigate to /admin/build/views and click the Add tab at the top of the page. Set the view name to something like gallery. Leave View type set to Node.
Set the title to Gallery. For Style set to Grid then chose 4 columns and set Alignment to Horizontal.
For Use pager set to Full pager. Then for Items per page, set to a multiple of 4, I am going to use 16 to give us a 4x4 grid of images. If you wish, you can set Use AJAX to Yes to stop the whole page being loaded on the pager.
Add the following Filters:
- Node: Published = On
- Node: Type = Image
Under Fields select Content: Image (field_image). Set Label to None and change Format to Lightbox2: thumbnail->lightbox.
Under Sort criteria you can set this to what you want. I am going to set them to newest first. Select Node: Post date and set to Descending.
On the left select Page from the drop down and click Add display.
Under Path set to gallery.
Press Save.
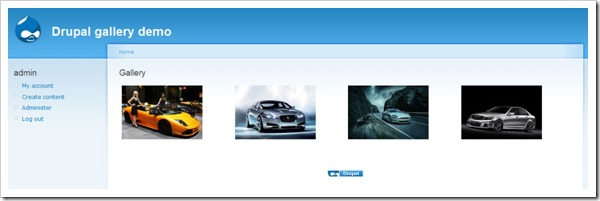
Now if you navigate to /gallery you can see your gallery in action.
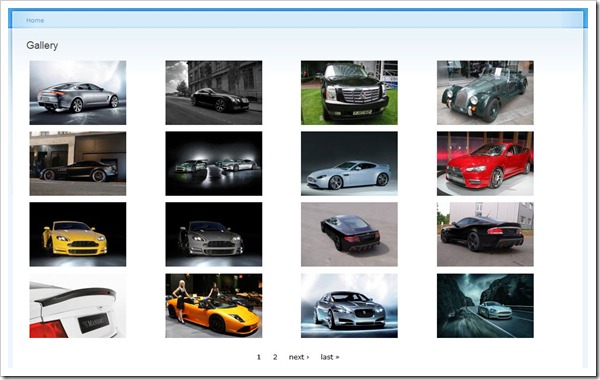
Once you upload more than 16 images which we set our Items per page to, a pager will appear.
Update: There may be cases where the image isn't uploaded to the image type when a user submits the node add form without uploading the image. This will show up as an empty section within the gallery and the node will be submitted with no image, but Imagefield will not tell the user that this is a problem even if it is a required field.
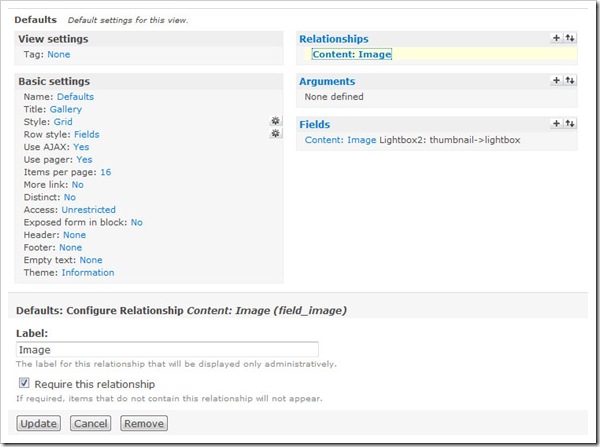
To stop these empty image types showing in the gallery, you will need to add a relationship for the image and set it to a required relationship. This way the image node will not appear in the gallery unless there is an image attached. You could then set up an additional view to find out which image nodes don't have an image attached.




Comments
admin
Fri, 2010-01-22 20:18
Permalink
@Tuttle, sorry about that had
@Tuttle, sorry about that had 2 lightbox packages installed when doing some testing.
DADAMO
Fri, 2010-01-22 20:23
Permalink
Hi ! This tutorial is really
Hi ! This tutorial is really useful, I was able to set up a little gallery.
Now, when I open the lightboxes, under the pictures there are 3 rows of text : View image details / Download original and Image x of n. How can I remove those 3 lines and just put the title instead ?
Af for the the border around the thumbnails, I read below that it has to be done through CSS, no other way at all ?
Thanks a lot !
admin
Fri, 2010-01-22 20:53
Permalink
@DADAMO, Yes the borders have
@DADAMO, Yes the borders have to be done in CSS. As for the text in the lightbox, normal users won't see the View image details / Download original image if they haven't got permissions. With Drupal it is a good idea to have 2 seperate browsers with one of them acting as an anonymous user so you can see how most people will see the site. You may want to try Shadowbox rather than Lightbox2 as it has less information and would fit with your theme a bit better.
DADAMO
Sat, 2010-01-23 12:59
Permalink
Alright, I'll try that !
Alright, I'll try that ! Thanks a lot for yur help !
Tuttle
Mon, 2010-01-25 15:37
Permalink
The lightbox just shows the
The lightbox just shows the images of the current page, not the whole gallery. Any was around this?
admin
Mon, 2010-01-25 21:51
Permalink
@Tuttle, Not unless you
@Tuttle, Not unless you change the view to allow all the images to show.
Tuttle
Thu, 2010-01-28 11:35
Permalink
I was refering to your
I was refering to your example page. Is there a way to use a pager on the page, but show all images in the lightbox slideshow?
admin
Thu, 2010-01-28 14:08
Permalink
@Tuttle, that is what I
@Tuttle, that is what I meant, I don't think you can have all the images appear in the lightbox slideshow without the images being on the page to start off with which means the pager would have to disappear. I am sure there probably is a way around it, but not easily within Views.
Gary
Mon, 2010-02-01 12:27
Permalink
Hello and thanks you a
Hello and thanks you a million for posting a tutorial to help people.
Sorry to say though, but it's two thumbs down from me.
Followed the tutorial step by step and it doesn't work. Nothing displayed in gallery or even individual content pages after file uploaded. Seems others have the same problem (after reading comments)
If so many people have the problem, please remove and/or update your tutorial until it's sorted out and it doesn't keep happening to so many people.
It could possibly be more unhelpful than helpful at the moment.
Many thanks
Gary - fellow drupal user
admin
Mon, 2010-02-01 13:42
Permalink
@Gary, The tutorial works for
@Gary, The tutorial works for the vast majority of people. The reason it doesn't work for you and some of the others will be down to your webserver/drupal configuration. The fact the images don't show even on the individual pages then it is likely imagecache isn't working properly. I imagine your files folder isn't fully writable. Are the images created?
SEO Web Design ...
Tue, 2010-02-02 15:51
Permalink
I followed the information
I followed the information here to customize CCK for a header Image rotator.
This is great stuff
keep doing the great work
Glenn
Thu, 2010-02-04 04:48
Permalink
Great tutorial. Thanks for
Great tutorial. Thanks for sharing you info and technique. Got it up and running in no time. Thanks James.
For people who can't see an image thumbnail. Most likely cause is that Imagecache is not working. Most common reason for Imagecache not working is that 'Clean URLs' are not enabled. IMPORTANT: for this technique to work, 'Clean URLs' needs to be on (or imagecache won't work, and the gallery won't work). Brillaint!
admin
Thu, 2010-02-04 10:13
Permalink
@Glenn, thanks for that,
@Glenn, thanks for that, didn't realise Imagecache required Clean URLs. I imagine that will sort out a few people.
kusumsaini
Mon, 2010-02-08 20:28
Permalink
Hi The tutorial was
Hi
The tutorial was good........
But dint work for me... I did all the settings as per the tutorial... But there are no images on the page.. even in the source code there is no html for images... :-(
I have clean urls enabled...
Files folder is writable... I did upload the image before submit...
I dont know why doesnt it work then.......
Please help....
cathyaustin
Tue, 2010-02-23 23:31
Permalink
Thanks Gary, followed your
Thanks Gary, followed your instructions and it works great!
bradleyh10
Thu, 2010-02-25 18:54
Permalink
I'm stuck a little early
I'm stuck a little early on.
When I attempt to add the field type of image and from the data type drop down menu I select file and widget type just says "file upload" not image.
Any ideas ?
admin
Thu, 2010-02-25 19:42
Permalink
@bradleyh10, Have you enabled
@bradleyh10, Have you enabled the imagefield module?
peter
Fri, 2010-02-26 22:14
Permalink
Hi, firstly let me thank
Hi,
firstly let me thank you for the great tutorial. Everything works out perfectly. However, when I log out and try to view my gallery as non registered viewer, no pictures appear (The Gallery, called Berlin, appears, just the pictures are not shown).
Do you know what could be the problem?
Cheers and thanks again,
Peter
admin
Sat, 2010-02-27 00:58
Permalink
@peter, make sure that
@peter, make sure that anonymous users have permission to view the different imagecache presets.
peter
Sat, 2010-02-27 11:27
Permalink
thanks a lot, of course that
thanks a lot, of course that worked ;)
Image Gallery i...
Sat, 2010-03-06 08:41
Permalink
[...] followed the
[...] followed the instructions at this blog post here which was real [...]
straightalk
Tue, 2010-03-09 02:16
Permalink
DO you have a quick fix for
DO you have a quick fix for the gallery..
ooops, I have installed Gallery everything works fine, only that I also have the "wibiya toolbar" and the lightbox stops working.
I know that both modules work on lightbox.. not sure if #1 or #2 .. I have turned of the social connection module (wibiya) and it works perfect!
Thank You
Norman Flecha
samdcruz
Thu, 2010-03-18 05:37
Permalink
hi, i have followed all the
hi, i have followed all the steps and added 2 images.
The problem i have on the add image page is that there are 2 browse for image boxes
Also when i view the gallery, thumbnails are not shown but the links are and if clicked they show the images on a new page.
see my gallery here :
http://www.i-newmedia.com/drupal/?q=gallery
Please help - thanks!
admin
Thu, 2010-03-18 10:23
Permalink
@samdcruz, You will need to
@samdcruz, You will need to set up your view properly. I would suggest you read through the tutorial again and follow it step by step. You also need to enable Clean URLs for ImageCache to work.
samdcruz
Thu, 2010-03-18 14:03
Permalink
thanks, however it will not
thanks, however it will not allow me to enable clean urls.
The message i get in drupal admin area is
"Your system configuration does not currently support this feature. The handbook page on Clean URLs has additional troubleshooting information."
I have read the drupal help and have modified the .htaccess file but it still does not allow me. any idea what to do or what code will work in the .htaccess ?
Kirari
Thu, 2010-03-18 16:33
Permalink
I made all the steps, but
I made all the steps, but shows my 6 images in 1 column, and I choosed horizontal in grid :( Why this?
admin
Fri, 2010-03-19 10:11
Permalink
@Kirari, I don't know I never
@Kirari, I don't know I never chose horizontal in grid selection. Is there any reason you have?
Jonas Anderö
Fri, 2010-03-26 09:20
Permalink
Really nice tutorial. I see
Really nice tutorial. I see you have made two tutorials, Gallery and Albums. What is the difference between Gallery and Album?
I'm trying to add images to my blog entries. So, is my blog items = album?
On my main pag, I would like to have a link to my highest rated images. = Gallery?
admin
Fri, 2010-03-26 10:19
Permalink
Neither would be suitable for
Neither would be suitable for what you want by the sounds of it. All you need is the imagefield on your blog content type and set up a view pulling out the images. Not sure how you would do rating of an image within a blog post though.
christensen143
Mon, 2010-03-29 17:45
Permalink
Those struggling with getting
Those struggling with getting the images to appear need to go to the permissions page and look for content_permissions module. Tick the boxes for view field_image (or whatever you named it) and the images will appear. Make sure the other permissions for Lightbox and Imagecache are ticked as well.
Great Tutorial!
juliawan
Wed, 2010-04-07 11:04
Permalink
I have follow it your
I have follow it your procedure, but it is doesn't show it for the picture , just show it about node published ,why?? is there anyone can help me to do that?
admin
Wed, 2010-04-07 13:21
Permalink
Make sure you have clean URLs
Make sure you have clean URLs enabled and that the permissions are set up correctly to allow users to view images.
juliawan
Mon, 2010-04-12 08:51
Permalink
thanks sir it is work now
thanks sir it is work now ,but now I have a problem with the lightbox 2, after I enabled the module in drupal, it cann't show for the lightbox, I confused it , and the format I have changed it, to lightbox 2-->thumbnail-->lightbox, but it cann't show the picture and the lightbox, and If I changed the format to image links to node, it can show the picture,now what must I do?
admin
Mon, 2010-04-12 09:16
Permalink
You will have to check to
You will have to check to make sure the lightbox is being included in the HTML and that all users have permission to view imagecache images.
juliawan
Wed, 2010-04-21 03:33
Permalink
ic ,thanks sir for the
ic ,thanks sir for the explanation ^^, I want to ask something sir about how to make drop down menus ,because in my themes is cann't show the drop down menu, and it is my file in page.tpl.php : http://pastebin.org/163734,
and this is my CSS : http://pastebin.org/163739
How to makes drop down menus sir to snippet into my page.tpl, I am really need your help sir ^^
admin
Wed, 2010-04-21 09:38
Permalink
Best to ask the creator of
Best to ask the creator of the theme if they have allowed any implementations. You could use the nice menus module.
juliawan
Thu, 2010-04-22 07:56
Permalink
yes sir for the menus
yes sir for the menus nice_module is can work on it ^^, but there is something bug in the primary links sir, after I enabled the module nice menus in drupal there are LETTER PRIMARY links in my menus, how to delete the letter PRIMARY Links in my menus sir? this is the nice_module files :
http://pastebin.org/167037
can delete the LETTER PRIMARY LINKS in my menus sir?
admin
Thu, 2010-04-22 09:06
Permalink
I don't use nice_menu module,
I don't use nice_menu module, put an issue in with the author.
juliawan
Fri, 2010-04-23 04:30
Permalink
ok sir I will try on it
ok sir I will try on it
Maryann
Thu, 2010-05-13 17:29
Permalink
I also followed this and did
I also followed this and did not get any images on my page. I checked the source code and when hovering over the in firebug, it would not load so I checked the path and the folder for "thumbnail" that we created in the Imagecache step was not there. I'm wondering if it was created somewhere else? I'm on a localhost and it won't let me enable clean URLs. Is this the problem? Once I created the folder myself and added the picture, the image loaded on the page, but it was not cropped and scaled.
admin
Thu, 2010-05-13 18:27
Permalink
You must have Clean URLs
You must have Clean URLs enabled for the imagecache module to work.
Ashwini
Sat, 2010-05-22 13:04
Permalink
I also followed this and did
I also followed this and did not get any images on my page. At the time of attaching a image to the node itself, the image was not shown. It only had shown a thumbnail, but when i tried to preview it or save it, the node was blank. it had no images and so the view also could not retrieve the image. What is the problem admin??? My cleanurl is enabled and i'm working on a localhost.
Ashwini
Sat, 2010-05-22 13:11
Permalink
Moreover, i noticed that the
Moreover, i noticed that the images are coded to be retrieved from sites\default\files\imagecache\thumbnails and lightbox but there are no images there.
Instead the lightbox images are saved, to “sites\default\files” and the thumbnails to "sites\default\files\imagefield_thumbs"
I have done things right but i don't know about the problem. Please help sir.
admin
Sat, 2010-05-22 13:28
Permalink
Make sure the files directory
Make sure the files directory is writable.
admin
Wed, 2010-05-26 23:32
Permalink
I don't see the label. Have
I don't see the label. Have you sorted it? If not, it may be some debug or cached view you are seeing.
Scott
Thu, 2010-05-27 00:28
Permalink
I'm noticing the tage Image:
I'm noticing the tage Image: infront of all my pictures when I browse to www.thunderpunch.net/gallery but when I edit the view the preview does not show these labels. If I go under fields and change the label to widgit default: image then it shows up under the preview. Any ideas?
Alexey
Wed, 2010-06-09 09:48
Permalink
I think it is necessery to
I think it is necessery to correct an error in this bundle of modules.
installation on native drupal runs without problems, the path to the images-thumbnails created, but on fact such images on the server like the folder structure does not exist. when resized thumbnails, even if the folder structure was created, it is removed. rights to "files" were exhibited and 775 and 777. Sorry for my English.
sst
Wed, 2010-06-16 23:41
Permalink
Hi, James; An excellent
Hi, James;
An excellent and clear tutorial. I've followed it to the letter up to the adding of a View (as a node).
The following page in Views will not permit me to
"Set the title to Gallery. For Style set to Grid then chose 4 columns and set Alignment to Horizontal."
The Views page offers only the one choice given for each of these options, and no means or method to change them. Nor can I change Filter as you tutorial goes on to suggest.
This is what is installed in Sites/all/modules:
Drupal 6.17
Views 6.x-2.10
CCK 6.x-2..6
FileField 6.x-3.3
Imagefield 6.x-3.3
ImageAPI 6.x-1.8
Imagecache 6.x-2.0
Lightbox 2-6.x-1.9
Is this a modules version issue?
Or is there some setting in Views I am overlooking?
Thanks,
sst
Peter
Thu, 2010-06-17 17:09
Permalink
James - First of all,
James -
First of all, thanks for a great tutorial. It has really helped me move forward immeasurably.
Second, in my gallery, I have set up Views exactly as you did and have gone back to re-check about ten times. The images in the gallery are appearing in duplicate and in a vertical column even though I have set everything to horizontal as you have in the tutorial.
Your help would be greatly appreciated.
Thanks.
Ballboy
Fri, 2010-06-18 11:15
Permalink
I read many tutorials on
I read many tutorials on gallery's and they always seem so overly complicated with views and cck fields. I found the best way is to use just the TinyMCE, IMCE and Lightbox2 modules.
I just create a standard page, insert a table, set it to 100% width and give it a background or what-not then simply click the insert image icon and browse to the image on your harddrive to generate the image (which it automatically crops and creates thumbnails to the users specifications), highlight the thumbnail and click 'insert'. Select the lightbox2 class (which you would have created when installing lightbox2) then click the 'link' icon and link it to the original image. Two minutes later I have a gallery which is fully editable and easily manipulated by anyone I allow...
Pages