Create a simple image gallery in Drupal 6 using CCK and Views
This tutorial will guide you through how to create a simple gallery within Drupal 6 using CCK, Views and a few more custom modules.
This tutorial was written with the following versions of Drupal and modules:
- Drupal 6.10
- CCK (Content Construction Kit) 6.x-2.1 (6.x-2.2)
- Views 6.x-2.3 (6.x-2.5)
- Filefield 6.x-3.0-beta1 (6.x-3.0-rc1)
- Imagefield 6.x-3.0-beta1 (6.x-3.0-rc1)
- ImageAPI 6.x-1.5 (6.x-1.6)
- Imagecache 6.x-2.0-beta8 (6.x-2.0-beta9)
- Lightbox2 6.x-1.9
Update: Modules have been updated to the latest versions as of 20 April 2009, version numbers are in brackets after the links above.
Installation
Install Drupal as you normally would and extract each of the modules to the /sites/all/modules directory. You should have a directory structure like the following:
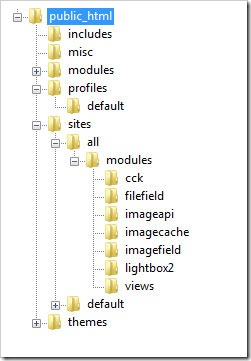
When logged in go to /admin/build/modules and enable the following modules:
- Content
- Filefield
- Imagefield
- ImageAPI
- ImageAPI GD2 (unless your server is configured for Imagemagick, then enable the ImageMagick module instead)
- ImageCache
- ImageCache UI
- Lightbox
- Views
- Views UI
Once you have ticked the modules, press Save configuration.
Imagecache
We need to create 2 presets for our images, one will be a thumbnail to show in the gallery and a second to show within the lightbox.
Navigate to /admin/build/imagecache and click Add new preset.
Set the preset Namespace to thumbnail. Click Add Scale and Crop, set the width to 180 and the height to 120.
Then create a new imagecache preset with the name lightbox. This time select Add Scale and set the width to 800 and the height to 600.
CCK Imagefield
First we will set up a new content type for our images which we will call Image. Navigate to /admin/content/types and click Add content type.
Set the name to Image and the type to image. You may enter a description if you wish.
Under Submission form settings, delete the text from the Body field.
Depending on how you want to set up the gallery, you can change the Workflow settings so that images aren’t automatically added but are added to an approval list, for this tutorial we will make all images published, so untick Promoted to frontpage and leave Published ticked.
Under Comment settings, set comments to disabled.
Save the content type.
Next to the Image content type click manage fields. In the Add New field area, set the label to Image and the field name to image (to make it field_image), for the Type of data to store, select File then for Form element select Image. Press Save.
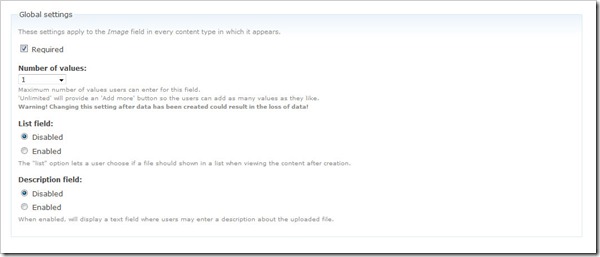
Under Global settings, tick the Required box and set the Number of values to 1. Leave the List field and Description field to Disabled.
Then press the Save field settings button.
Now click the Display fields tab at the top of the page.
Set the Label to Hidden and set both the Teaser and Full node to Lightbox2: thumbnail->lightbox.
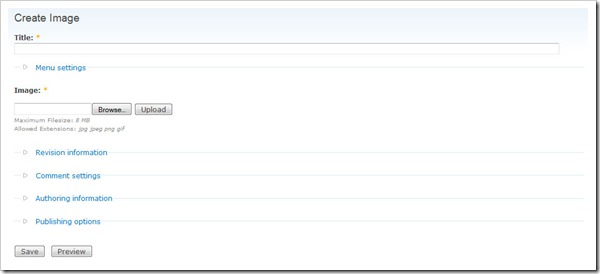
Now under /node/add/image we can add an image to go in to our gallery.
For now create 3 or 4 images.
Under /admin/content/node you should now have some nodes.
Now we will set up a view to display these nodes in a gallery.
Views
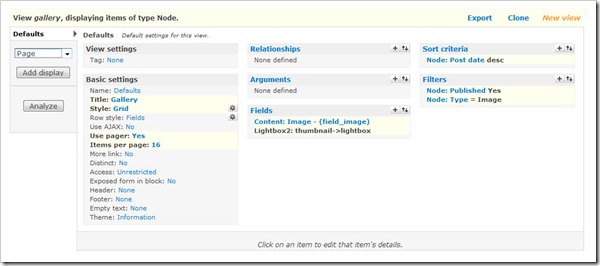
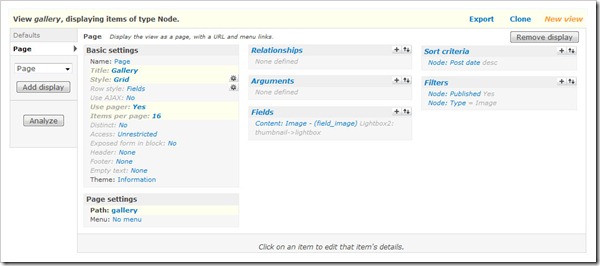
Navigate to /admin/build/views and click the Add tab at the top of the page. Set the view name to something like gallery. Leave View type set to Node.
Set the title to Gallery. For Style set to Grid then chose 4 columns and set Alignment to Horizontal.
For Use pager set to Full pager. Then for Items per page, set to a multiple of 4, I am going to use 16 to give us a 4x4 grid of images. If you wish, you can set Use AJAX to Yes to stop the whole page being loaded on the pager.
Add the following Filters:
- Node: Published = On
- Node: Type = Image
Under Fields select Content: Image (field_image). Set Label to None and change Format to Lightbox2: thumbnail->lightbox.
Under Sort criteria you can set this to what you want. I am going to set them to newest first. Select Node: Post date and set to Descending.
On the left select Page from the drop down and click Add display.
Under Path set to gallery.
Press Save.
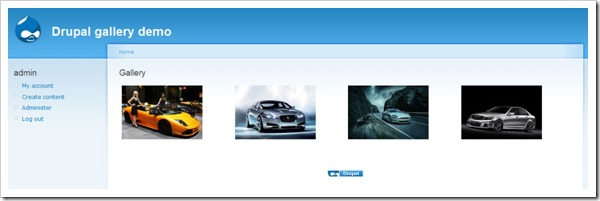
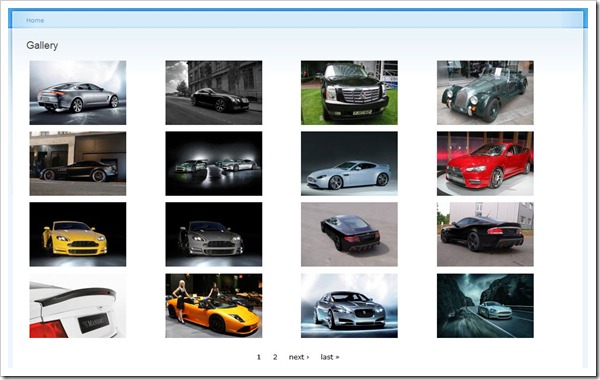
Now if you navigate to /gallery you can see your gallery in action.
Once you upload more than 16 images which we set our Items per page to, a pager will appear.
Update: There may be cases where the image isn't uploaded to the image type when a user submits the node add form without uploading the image. This will show up as an empty section within the gallery and the node will be submitted with no image, but Imagefield will not tell the user that this is a problem even if it is a required field.
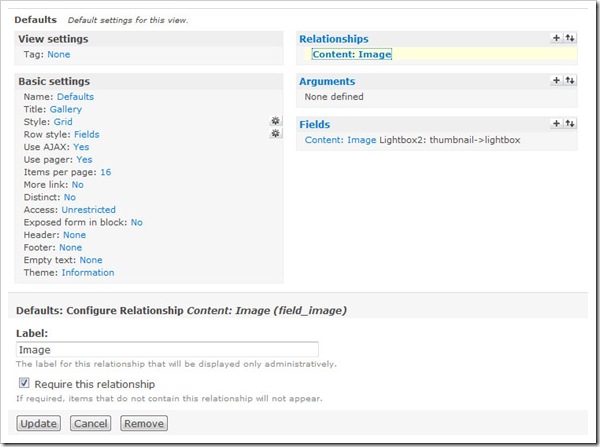
To stop these empty image types showing in the gallery, you will need to add a relationship for the image and set it to a required relationship. This way the image node will not appear in the gallery unless there is an image attached. You could then set up an additional view to find out which image nodes don't have an image attached.




Comments
admin
Sat, 2010-06-19 19:08
Permalink
But requires knowledge of
But requires knowledge of HTML when the gallery gets complicated, doesn't allow pagination and is using a table for non-tabular data.
shuvro
Sun, 2010-06-27 17:09
Permalink
One prb i feel..only admin
One prb i feel..only admin can watch that image gallery..but a register user or authenticated user can`t watch this gallery...any one help me?
admin
Sun, 2010-06-27 18:12
Permalink
You will need to look at your
You will need to look at your access permissions for imagecache or any other module that deals with access.
DuartmaN
Tue, 2010-07-13 16:36
Permalink
Nice tuturial, se my gallery
Nice tuturial, se my gallery made with this modules at
http://www.duartstudio.com/home/?q=galeria
DC
Juliawan
Tue, 2010-07-20 09:53
Permalink
Hai sir , I have some
Hai sir , I have some question about this section about Create a simple image gallery in Drupal 6 using CCK and Views, and now after I try it is work on it, but the trouble sir is like this :
in the basic settings in items per page =16, and now after I try on it, it is appear 16 pictures on this page, but the trouble sir, is in lightbox after I click on the picture 16, there is cann't navigation right on to going in picture number 17, only just I must to click navigation paging 2, so it is can start again for the navigation right on the picture, how to solve this problem sir??,
thanks for the advance
James
Tue, 2010-07-20 18:17
Permalink
I'm sure it can be done, but
I'm sure it can be done, but I am not sure how.
abu bakar
Mon, 2010-07-26 08:06
Permalink
i done all this but when i
i done all this but when i upload a file there is no image. when i see the fire bug i read the src and when i see there is no folder of lightbox and thumbnail also. i manually create these folder. whats happend. please tell me. and 2nd thing is the images upload here sites/default/files and the thumbnail upload here sites/default/files/imagefield_thumbs. i cant understand what is this happened. please tell me where the problem is
Thanks in Advance
Abu bakar
James
Mon, 2010-07-26 10:22
Permalink
Enable clean urls.
Enable clean urls.
Ryan B
Mon, 2010-07-26 11:33
Permalink
I am having an issue creating
I am having an issue creating separate links to other image galleries from the original gallery. Basically I want to create an album. I did try your album tutorial, but it didn't turn out very well for me. If I could do this, it would be perfect.
The following images help describe my mission:
http://i8.photobucket.com/albums/a18/Nioin3k/Untitled-1.gif
http://i8.photobucket.com/albums/a18/Nioin3k/Untitled-2.gif
All help is appreciated. For your help I will reward you with a hug or a kiss, your choice.
P.S. If there is a module out there that will give me similar results, that would be helpful too! I looked all over and I haven't found one that met my needs.
James
Mon, 2010-07-26 11:35
Permalink
The album tutorial is the one
The album tutorial is the one you want to follow.
Fifi
Fri, 2010-07-30 20:26
Permalink
It's a good tutorial, i can
It's a good tutorial, i can followed this without any difficulties. But i have problem with the result. The images are shown in actual size instead of in thumbnail size. I wonder where's the problem. Could you please help me with this problem?? Cause i can't find the problem.
Thanks in advance
Fifi
Fifi
Fri, 2010-07-30 20:53
Permalink
Problem solved. There's a
Problem solved. There's a mistake when choosing fields content:image. But, why the thumbnail got cut? How to make it is not cut but only resize.
James
Mon, 2010-08-02 11:33
Permalink
You will need to look at your
You will need to look at your view again and change the image display settings to thumbnail.
James
Mon, 2010-08-02 11:33
Permalink
Chose the scale option not
Chose the scale option not scale and crop.
Jenifer
Tue, 2010-08-17 04:54
Permalink
Hi James, you kindly pointed
Hi James, you kindly pointed me at another one of your tutorials for me to look at how to display a set of images associated with nodes. I'm making progress using this tutorial and have run into a problem that @Sandeep posted. I changed the view to thumbnail -> Original and got that to work. However, I don't see the thumbnails on the page, only the titles as links (which is all I got when I had it set to thumbnail -> lightbox. Any ideas as I don't think it's a memory problem that @Sandeep later posted.
Another great tutorial and very easy to follow :-)
James
Tue, 2010-08-17 12:57
Permalink
I assume you have enabled
I assume you have enabled Clean URLs?
Jenifer
Tue, 2010-08-17 13:38
Permalink
Hi James, Yep, clean URLs
Hi James,
Yep, clean URLs are enabled. Have flushed the cache too, so not quite sure what's going on here as even with changing it to thumbnail -> thumbnail, I'm getting the lightbox effect! Will have another go this evening
James
Tue, 2010-08-17 14:29
Permalink
Have you looked at the HTML
Have you looked at the HTML source to see if the thumbnail image URLs are correct? I assume there is nothing in your report log in Drupal? I remember having this problem ages ago on a test site where it had worked before and ended up using Thickbox rather than Lightbox.
Jenifer
Tue, 2010-08-17 14:51
Permalink
Hi James, yes the URLs look
Hi James, yes the URLs look as if they're right and I'll check the logs to see if I can pin it down further. With the thumbnail > lightbox set up, the imagecache path was shown but the images aren't being added so might be a permission thing going on preventing them from being saved there. Thanks for the tip about swapping to Thickbox.
Jenifer
Wed, 2010-08-18 17:52
Permalink
I found the problem James...
I found the problem James... humble apols I hadn't enabled Imagemagick ... now have everything working ;-)
a3pelawi
Thu, 2010-08-19 08:02
Permalink
It's work for me, just
It's work for me, just switching to the Private download method under admin/settings/file-system.
Thanks in advance
AJ
Thu, 2010-08-26 10:10
Permalink
Thanx that worked with me. I
Thanx that worked with me. I had the same case as yours but after enabling the private setting the way you did it worked
Dillibabu
Tue, 2010-08-31 10:26
Permalink
This procedure very good i am
This procedure very good i am also used it . Thanks
Bob
Fri, 2010-09-10 17:22
Permalink
Nice! Took me a while to
Nice!
Took me a while to realize I had to go down to the bottom of the field configuration to find the thumbnail option.
Mike
Mon, 2010-10-04 16:34
Permalink
Brilliant tutorial. Many
Brilliant tutorial.
Many thanks.
Just one minor point - some people might be confused by this bit: "Now under /node/add/image we can add an image to go in to our gallery."
Still, really well written. Author should be very proud of this work. A real benefit to the Drupal community.
Ricardo
Fri, 2010-10-08 01:38
Permalink
Hi Admin well i'm new to
Hi Admin well i'm new to drupal!!
I did all the steps that the tutorial specify but when i hit /gallery this is what appears: http://agarraondape.adrquintaspedro.pt/gallery
As i'm new to drupal i don't know what to try to put this to work
PS: i'm sure the images are uploaded and the nodes for each image do exist
James
Fri, 2010-10-08 14:25
Permalink
There must be a problem with
There must be a problem with your view as none of the images are showing up at all even in the code.
Nisam
Mon, 2010-10-18 14:52
Permalink
thanks dude, its realy
thanks dude,
its realy awsome tutorial, i never seen this kind of simple tutorial presentation, thanks alot
Create a simple...
Mon, 2010-10-18 17:26
Permalink
[...] it out
[...] it out http://jamestombs.co.uk/2009-03-18/create-a-simple-image-gallery-in-drup... VN:F [1.9.5_1105]please wait...Rating: 0.0/10 (0 votes cast)VN:F [1.9.5_1105]Rating: 0 (from 0 [...]
Mac
Tue, 2010-10-19 20:39
Permalink
James, Great tutorial. It
James,
Great tutorial. It works for the most part. My only issue is the grid is layed out in a 4xX format. The images get put in all different spots. I'm not sure why this is.
I can send you a link to see, but I don't want it in this thread forever. So I didnt put here.
Any help would be appreciated.
Thanks, Mac
James
Tue, 2010-10-19 22:29
Permalink
From memory the Views "Grid"
From memory the Views "Grid" view uses tables and can change column sizes depending on image sizes, text etc so it would be best to use CSS in your theme to make each column 25% of the table.
Daniel
Thu, 2010-11-18 05:10
Permalink
Great tutorial, James. Hope
Great tutorial, James. Hope one day I can be as effective helping others gain skill by writing comprehensive tutorials.
I am having a slight challenge though. How does one set the path, either for imagecache or Lightbox? Midway through configuring and adding some image content I started to see preview links popping up but all of my links are broken.
http://localhost/drupal_test/sites/default/files/imagecache/Lightbox/243...
The above link is for I photo I uploaded named 243. I noticed that Lightbox as a sub-directory did not exist in my tree and manually created it. This did not alleviate the problem.
If it makes a difference, I am using Drupal 6.19 with the latest versions of the extensions compatible with 6.x. Should I hunt down the versions you explicitly mention?
Cheers,
Daniel
James
Thu, 2010-11-18 10:18
Permalink
The Lightbox part of the URL
The Lightbox part of the URL is the imagecache preset, if this isn't being created automatically then your files directory probably isn't enabled, and/or you haven't got Clean URLs enabled which is required.
Vincent
Mon, 2010-11-29 17:59
Permalink
Great! ... Thanks for this
Great! ... Thanks for this tutorial.
It works with shadwobox too! (just to mention this ;-)
regards
Vincent
thanga
Fri, 2010-12-10 07:29
Permalink
Hey, superb explanation ya.
Hey, superb explanation ya.
Ivan
Mon, 2010-12-20 02:32
Permalink
Thank you so much for the
Thank you so much for the advice!!!
It worked for me too! My site currently is in development and I experienced the problem with missing thumbnails. I though that this some sort of bug in Image API.
Private uploading method is the solution.
xzen
Mon, 2011-01-03 02:03
Permalink
Hi, i folow your tutorial
Hi,
i folow your tutorial (great) but i have a probleme, i only see the "title" of "" preview.
This is the preview : /sites/default/files/imagecache/thumbnail/IMG_2737.JPG
The thumbnail directory is empty ..
Have you got an idea ?
Thx
Xzen
Alex
Tue, 2011-01-04 01:40
Permalink
instead of creating
instead of creating complicatedx and slow Lightbox/Fancybox/Thickbox based viewers,Thickbox viewers, how to create SIMPLE *inline* image switcher (no fancy stuff), like this one:
http://www.varal.org/media/imageswitcher/
How to implement this Switcher into a node?
James
Wed, 2011-01-05 14:35
Permalink
I have gotten to the part
I have gotten to the part where it says "
Set the Label to Hidden and set both the Teaser and Full node to Lightbox2: thumbnail->lightbox." which i have done but i can't seem to find the part where it says "Now under /node/add/image we can add an image to go in to our gallery.
". pls forgive me I am a newbie
James
Wed, 2011-01-05 22:13
Permalink
Go to the URL
Go to the URL http://www.domain.com/node/add/image, alternatively select Create Content from the Navigation menu.
Mwenyeji
Fri, 2011-01-14 14:28
Permalink
Great tutorial. I have
Great tutorial.
I have reached the point where I was on managing the the fields where you say "set both the Teaser and Full node to Lightbox2: thumbnail->lightbox."
My Problem is I could get 'Lightbox2: thumbnail->lightbox.' in the drop down menu so I chose Lightbox image for both Teaser and Full node.
When I go forward to upload images I get the following error message.
"
MyAn HTTP error 0 occurred.
/eityconsult/?q=filefield/ahah/image/field_image/0
"
Am lost on what to do.
Mwenyeji
Fri, 2011-01-14 14:29
Permalink
Ignore the MY at the start of
Ignore the MY at the start of the error message its a typo error.
Mwenyeji
Fri, 2011-01-14 15:55
Permalink
NeverMind I used the 1.9
NeverMind I used the 1.9 version n it worked.
Had earlier on tried with 1.7 and the latest 1.11.
Again thanks.
Anonymous
Fri, 2011-02-04 06:19
Permalink
Pick Image from gallery
Is it possible to pick an image from the gallery & the selected image will be shown to the user
james
Fri, 2011-02-04 18:51
Permalink
Don't understand what you
Don't understand what you mean.
Anonymous
Tue, 2011-02-08 15:47
Permalink
Thank you very much! Your
Thank you very much! Your tutorial was very helpfull! I've spoiled few days trying to make gallery for my site and now its working!
Denis, Sevastopol
Anonymous
Tue, 2011-02-08 21:56
Permalink
Example site
Hi James,
Thanks for the tutorial.
Would it be possible to check your example site and restore it? (Or maybe do another one?)
Thanks
Anonymous
Fri, 2011-02-11 21:21
Permalink
Link images to a page?
I need to basically do what you did in this tutorial, but instead of linking to a lightboxed image, I need to have the small images link to a page pertaining to that particular image. However, I can't seem to wrap my mind around how you would go about doing that
james
Sun, 2011-02-13 11:07
Permalink
Just change the image display
Just change the image display type on the View.
Anonymous
Wed, 2011-03-16 01:30
Permalink
Excellent post
I usually learn best through examples, but they are sometimes hard to find. Luckily this page is here, and it helped me to learn basics of views in a few minutes.
Thank you so much!
Pages