Create a simple image gallery in Drupal 6 using CCK and Views
This tutorial will guide you through how to create a simple gallery within Drupal 6 using CCK, Views and a few more custom modules.
This tutorial was written with the following versions of Drupal and modules:
- Drupal 6.10
- CCK (Content Construction Kit) 6.x-2.1 (6.x-2.2)
- Views 6.x-2.3 (6.x-2.5)
- Filefield 6.x-3.0-beta1 (6.x-3.0-rc1)
- Imagefield 6.x-3.0-beta1 (6.x-3.0-rc1)
- ImageAPI 6.x-1.5 (6.x-1.6)
- Imagecache 6.x-2.0-beta8 (6.x-2.0-beta9)
- Lightbox2 6.x-1.9
Update: Modules have been updated to the latest versions as of 20 April 2009, version numbers are in brackets after the links above.
Installation
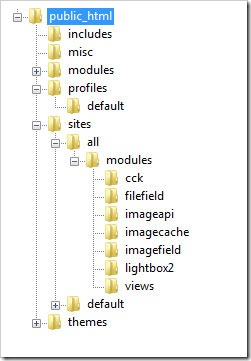
Install Drupal as you normally would and extract each of the modules to the /sites/all/modules directory. You should have a directory structure like the following:
When logged in go to /admin/build/modules and enable the following modules:
- Content
- Filefield
- Imagefield
- ImageAPI
- ImageAPI GD2 (unless your server is configured for Imagemagick, then enable the ImageMagick module instead)
- ImageCache
- ImageCache UI
- Lightbox
- Views
- Views UI
Once you have ticked the modules, press Save configuration.
Imagecache
We need to create 2 presets for our images, one will be a thumbnail to show in the gallery and a second to show within the lightbox.
Navigate to /admin/build/imagecache and click Add new preset.
Set the preset Namespace to thumbnail. Click Add Scale and Crop, set the width to 180 and the height to 120.
Then create a new imagecache preset with the name lightbox. This time select Add Scale and set the width to 800 and the height to 600.
CCK Imagefield
First we will set up a new content type for our images which we will call Image. Navigate to /admin/content/types and click Add content type.
Set the name to Image and the type to image. You may enter a description if you wish.
Under Submission form settings, delete the text from the Body field.
Depending on how you want to set up the gallery, you can change the Workflow settings so that images aren’t automatically added but are added to an approval list, for this tutorial we will make all images published, so untick Promoted to frontpage and leave Published ticked.
Under Comment settings, set comments to disabled.
Save the content type.
Next to the Image content type click manage fields. In the Add New field area, set the label to Image and the field name to image (to make it field_image), for the Type of data to store, select File then for Form element select Image. Press Save.
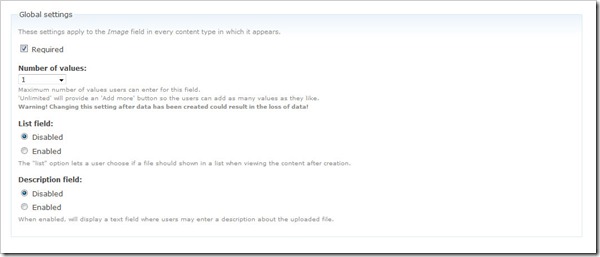
Under Global settings, tick the Required box and set the Number of values to 1. Leave the List field and Description field to Disabled.
Then press the Save field settings button.
Now click the Display fields tab at the top of the page.
Set the Label to Hidden and set both the Teaser and Full node to Lightbox2: thumbnail->lightbox.
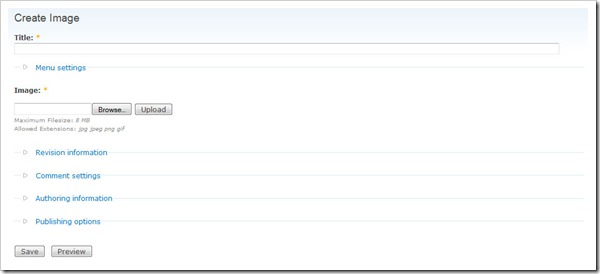
Now under /node/add/image we can add an image to go in to our gallery.
For now create 3 or 4 images.
Under /admin/content/node you should now have some nodes.
Now we will set up a view to display these nodes in a gallery.
Views
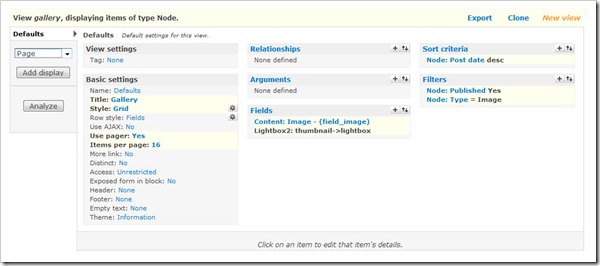
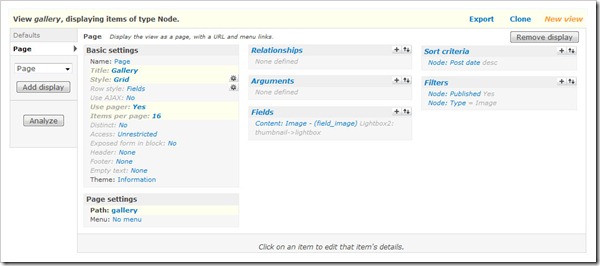
Navigate to /admin/build/views and click the Add tab at the top of the page. Set the view name to something like gallery. Leave View type set to Node.
Set the title to Gallery. For Style set to Grid then chose 4 columns and set Alignment to Horizontal.
For Use pager set to Full pager. Then for Items per page, set to a multiple of 4, I am going to use 16 to give us a 4x4 grid of images. If you wish, you can set Use AJAX to Yes to stop the whole page being loaded on the pager.
Add the following Filters:
- Node: Published = On
- Node: Type = Image
Under Fields select Content: Image (field_image). Set Label to None and change Format to Lightbox2: thumbnail->lightbox.
Under Sort criteria you can set this to what you want. I am going to set them to newest first. Select Node: Post date and set to Descending.
On the left select Page from the drop down and click Add display.
Under Path set to gallery.
Press Save.
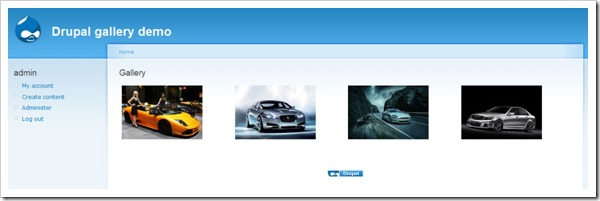
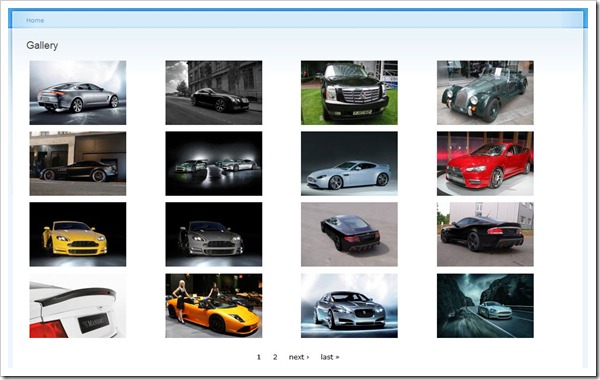
Now if you navigate to /gallery you can see your gallery in action.
Once you upload more than 16 images which we set our Items per page to, a pager will appear.
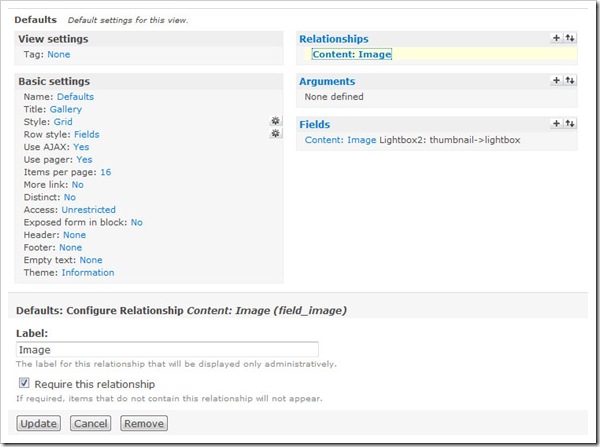
Update: There may be cases where the image isn't uploaded to the image type when a user submits the node add form without uploading the image. This will show up as an empty section within the gallery and the node will be submitted with no image, but Imagefield will not tell the user that this is a problem even if it is a required field.
To stop these empty image types showing in the gallery, you will need to add a relationship for the image and set it to a required relationship. This way the image node will not appear in the gallery unless there is an image attached. You could then set up an additional view to find out which image nodes don't have an image attached.




Comments
jayashree
Fri, 2009-09-25 10:11
Permalink
hi very nice explanation
hi
very nice explanation exactly get the result.Thx
Starkos
Thu, 2009-10-29 22:24
Permalink
Awesome, saved me a ton of
Awesome, saved me a ton of time. Thanks for writing this up!
efyuze
Thu, 2009-11-05 00:12
Permalink
Hello, First all all I would
Hello,
First all all I would like to thank you for putting this tutorial together because it has really helped me (a beginner to drupal) to get my gallery site up and running without problems !
Ok now I would like to have my images filtered by category. I had a look online regarding using the Taxonomy module to filter my images, but got lost on the way. I setup taxonomy module but couldn’t get the dropdown menu(to filter my images by category) to appear on my Gallery page. I set the Filters prop. of the Gallery view to NodeType=Image..Please help !!!
thanks
Paul
Thu, 2009-11-12 21:38
Permalink
Hi, Thanks for the
Hi,
Thanks for the tutorial, I searched a lot of them and your gallery looked the best and the instructions the easiest. I made this gallery and it almost works, but when I click on the thumbnail the lightbox doesn't come up; instead a huge dark box appears at the bottom of the page and then the photo shows up underneath! All the modules are up to date, any idea what could cause a problem like that?
Paul
www.kinlayhousecork.ie/gallery
admin
Fri, 2009-11-13 09:59
Permalink
@Paul, it looks like there is
@Paul, it looks like there is a problem with your custom theme somewhere. The lightbox stuff is loading up OK, so I assume it will be something in your CSS.
Nyleve
Sun, 2009-11-15 19:28
Permalink
efyuze, when you're in
efyuze,
when you're in Views you need to add your relevant taxonomy vocab in 'filters' and expose it. Once that's done you need to change your 'Exposed form in block:' option form 'no' to 'yes' under the 'basic' settings' menu.
I hope that helps.
Shelly
Mon, 2009-11-16 08:23
Permalink
Hey. thanks for the great
Hey.
thanks for the great tutorial, it helped me alot
but,,,,I have a problem in the thumbnails display
as you can see in the link below
http://www.ironi-alef55.org/gallery
the thumbnail are too close to each other.
how can I fix that ?
Kingfisher
Mon, 2009-11-16 08:30
Permalink
I have set the path name to
I have set the path name to /gallery but after saving this when i go to url, browser display this message "Page not found"...
At the time of saving the view browser display this message "Display Page uses a path but the path is undefined."
Plz help me.
Arun
Mon, 2009-11-16 09:02
Permalink
Thanks ... nice tutorial
Thanks ... nice tutorial
admin
Mon, 2009-11-16 11:03
Permalink
@Shelly, It will be down to
@Shelly, It will be down to your theme, alternatively you can use less images per row to spread them out a bit.
@Kingfisher, Did you definately save the view after setting the path?
Karu
Thu, 2009-11-19 00:57
Permalink
Excellent information, thank
Excellent information, thank you.
Justin
Sat, 2009-11-21 10:51
Permalink
This was the first tutorial
This was the first tutorial that worked for me as far as Drupal was concerned. But it seems pretty painful to upload a plethora of images. Is there a way to facilitate more images at one time? I've got a lot I need to get up but just uploading the 4 for this demonstration took minutes individually.
Awesome job though.
admin
Sat, 2009-11-21 11:03
Permalink
@Justin, Yes you can upload
@Justin, Yes you can upload multiple images at one. You will need to use the Image FUpload module and use that rather than the CCK Imagefield.
Paolo
Tue, 2009-11-24 11:24
Permalink
Thank you very much for this
Thank you very much for this useful tutorial!!
Paolo
Brad
Wed, 2009-11-25 06:14
Permalink
you rock dude. I have been
you rock dude. I have been looking for this solution way too hard. node gallery... views attach... gallery2... acidfree... blah. This is the simplest way. I will now use panels 3 to create the style i want. awesome.
Sve
Sun, 2009-11-29 18:24
Permalink
Veri good tut for
Veri good tut for me!
Thank you!
Linda
Wed, 2009-12-02 05:20
Permalink
Hi. Having a problem. Under
Hi. Having a problem. Under the CCK Imagefield area I was successful until this line: Now under /node/add/image we can add an image to go in to our gallery.
I cannot make that Create Image page appear! Everything else to that point worked fine. Anyone else have that problem?
admin
Wed, 2009-12-02 11:20
Permalink
What did you call your image
What did you call your image node? Alternatively, rather than using that URL use the Create content menu item in the navigation menu.
Awijeet
Thu, 2009-12-03 07:27
Permalink
Thanks for giving that kind
Thanks for giving that kind of clear demo.
:)
Linda
Sun, 2009-12-06 05:33
Permalink
Hi - I hear all the great
Hi - I hear all the great compliments, and so it makes me think I've done something wrong. When I try to display my gallery I get a Fatal error: Call to undefined method views_plugin_cache_none::post_render() in /ftp/pub/skygal/drupal/sites/all/modules/views/includes/view.inc on line 855. In going to line 854-856, I find this:
if ($cache) {
$cache->post_render($this->display_handler->output);
}
Can you point me in the right direction?
Thank you!
admin
Sun, 2009-12-06 12:08
Permalink
@Linda, That will be a
@Linda, That will be a problem with your installation. Try downloading and updaing views.
Linda
Sun, 2009-12-06 17:35
Permalink
Huh. Would never have
Huh. Would never have thought of that! Thanks - I'll give it a try.
Brian
Tue, 2009-12-08 13:32
Permalink
This is a great tutorial.
This is a great tutorial. I'm looking for this and a bit more though. I would like to have multiple galleries and a page that lists a thumbnail and a description to access each gallery. Is that possible?
nexus74
Tue, 2009-12-08 14:41
Permalink
Why are there sooo much
Why are there sooo much complexities to adding a simple gallery in Drupal??
It takes eight modules to do this?
admin
Tue, 2009-12-08 18:54
Permalink
@Brian, Have a look at my
@Brian, Have a look at my Create an album based image gallery in Drupal 6 using CCK and views tutorial on how to do that.
@nexus74, No, it doesn't take 8 modules to get a simple gallery in Drupal. It takes 8 modules to create a simple gallery using this method which allows a lot of customisation. There are modules that do galleries in Drupal with one module, but this allows flexibility and can be changed to work in many different ways.
Brian
Tue, 2009-12-08 19:34
Permalink
Thanks! - found it, and will
Thanks! - found it, and will give it a whirl this evening. Is there a link to the result? Is the section after - http://jamestombs.co.uk/2009-06-25/creating-a-grid-of-images-for-an-albu... necessary, or can the grid view be modified via the view?
Thanks for your well documented tutorials and quick responses!
admin
Tue, 2009-12-08 20:43
Permalink
@Brian, I think you can do it
@Brian, I think you can do it through the view, but you would have to look for some sort of node override within Views. The grid using PHP is a way to do it, but like with most things Drupal there are many ways to most things. Sorry, no link to a demo, it should look very similar to the simple gallery except with the description/gallery title under/above the image.
nexus74
Thu, 2009-12-10 05:38
Permalink
@admin, thank you for your
@admin, thank you for your response. I thought there would be one module as well. However, when I tried this before I knew about this tutorial, It seems like I still had to download one module after another...
I'll look into it more.
Moin
Thu, 2009-12-10 13:50
Permalink
Nice tutorial.... easy to
Nice tutorial.... easy to learn basic concept
Linda
Sat, 2009-12-12 19:17
Permalink
So I finally did my upgrade
So I finally did my upgrade and the gallery magically appeared! Still needs work, but at least I have something to work on, now. Thanks so much for the help!
Andrew
Fri, 2009-12-18 02:33
Permalink
Excellent Tutorial, Easy to
Excellent Tutorial, Easy to follow!
Few follow up queries about added functionality..
How hard is it to create multiple galleries? Rather than having just 1 big Gallery i would like it that my user could create a gallery and then stipulate which gallery they can upload the files to.
Another query is, what is involved in having a comment box, much like this one, where users can comment on single images?
Andrew
Fri, 2009-12-18 02:35
Permalink
Whoops. noticed my first
Whoops. noticed my first question is answered in another tutorial on this site! How silly of me.
sam
Fri, 2009-12-18 04:30
Permalink
hey, why there is a broken
hey, why there is a broken link of images appeared in my page..I cant see the imgae I have uploaded.
admin
Fri, 2009-12-18 11:15
Permalink
@sam, make sure you have
@sam, make sure you have write permissions to your files directory.
Vinidog
Sun, 2009-12-20 05:13
Permalink
Great, great, great... Tks
Great, great, great...
Tks a lot!!!
alekth
Wed, 2009-12-30 06:33
Permalink
Thanks so much for this
Thanks so much for this tutorial, I'm going to look into the album based one now!
I have one problem though, I don't get the previous/next links in the Lightbox popup.
Jeff
Sat, 2010-01-02 01:02
Permalink
Thanks for the tutorial - the
Thanks for the tutorial - the output is exactly what I was looking for, and easy to theme for my website.
BUT, I have a problem - the images I uploaded when into /default/files and /default/files/imagefield_thumbs instead of under imagecache. The thumbnails, etc are generated correctly but put into the wrong directory. I've been through the tutorial twice. Any thoughts?
admin
Sat, 2010-01-02 14:22
Permalink
@Jeff, I have looked at your
@Jeff, I have looked at your site and your images are being created in the imagecache directory. When you upload an image using CCK Imagefield it is placed in your files directory unless you specifiy another directory within the CCK field settings. Copies of the image are created in the Imagecache folder with the settings applied to the image.
Jeff
Sat, 2010-01-02 16:10
Permalink
Any ideas on how to get
Any ideas on how to get captions to show up, either in the main gallery or in the Lightbox popup?
Jeff
Sat, 2010-01-02 16:11
Permalink
@admin - regarding the path
@admin - regarding the path problem: my fault, I didn't see there were older pages of comments. The changing of the file system to "private" fixed it on my test system. Thanks!
bstrange
Tue, 2010-01-05 03:47
Permalink
I got everything to work
I got everything to work correctly; however, there is no paging going on. Pager is set to full, ajax enabled and 9 items per page.
There are around 45 images total and all are viewable in admin/content and all show up if I set total number per page to 45.
It just seems page 2-5 (with my current 9 img per page setting) won't load.
Any thoughts? Oh, and thanks for the outstanding tutorial!
admin
Tue, 2010-01-05 10:19
Permalink
@bstrange, I can only assume
@bstrange, I can only assume it is down to your theme. Try setting it to Garland and see if the pager shows up properly.
shweta gusain
Tue, 2010-01-05 11:47
Permalink
Sir i want to help, while
Sir i want to help, while using this image gallery i encountered with the some problem .I m anable to create new preset.while on clicking add new preset it showing the following warning
"warning: call_user_func_array() expects parameter 1 to be a valid callback, function 'imagecache_ui_preset_add_form' not found or invalid function name in D:\Apache\xampp\htdocs\drupal-6.15\includes\form.inc on line 372."
please help me out
bstrange
Tue, 2010-01-05 16:39
Permalink
the theme *IS* actually
the theme *IS* actually garland with heavily modified graphics to give the appearance of a custom theme. No significant changes to css or additional files added.
bstrange
Tue, 2010-01-05 16:58
Permalink
Lol, boy are you the smart
Lol, boy are you the smart one :) It *was* the theme...well sortof. I modded all the graphics to give Garland a black background....
(cough) pager numbering is black (cough)
Boy do I feel stupid :P
Thanks again for the GREAT tutorial and help figuring this out!
bstrange
Tue, 2010-01-05 21:14
Permalink
Ok this is probably a stupid
Ok this is probably a stupid question, but do you have any idea how I would place a very thin border w/padding around the thumbnails? I am pretty sure it would be done through css, but I'm not sure where to start.
admin
Tue, 2010-01-05 22:44
Permalink
@sheta gusain, looks to be an
@sheta gusain, looks to be an issue with Imagecache. Make sure the correct version is installed for your Drupal installation.
admin
Tue, 2010-01-05 22:47
Permalink
@bstrange, depends on what
@bstrange, depends on what you called your view etc, but the following css should work:
.view-gallery .views-field-field-image-fid img { border: 1px solid #c00; padding: 5px; }
That will add a 1px red border with 5 pixels of padding between the thumbnail and the border.
Pat
Thu, 2010-01-14 06:07
Permalink
check out the instructions on
check out the instructions on post 12 on this forum post.
once you do follow those steps, you need to have the field in your view use "Lightbox2 iframe: thumbnail->node page". then, copy the page-node-lightbox.tpl.php into your theme and take out all the wrapper stuff.
Tuttle
Fri, 2010-01-22 17:57
Permalink
When I klick on an Image in
When I klick on an Image in the example gallery, two different interactive (Javascript?) galleries pop up. Rather strange.
Pages