Create a simple image gallery in Drupal 6 using CCK and Views
This tutorial will guide you through how to create a simple gallery within Drupal 6 using CCK, Views and a few more custom modules.
This tutorial was written with the following versions of Drupal and modules:
- Drupal 6.10
- CCK (Content Construction Kit) 6.x-2.1 (6.x-2.2)
- Views 6.x-2.3 (6.x-2.5)
- Filefield 6.x-3.0-beta1 (6.x-3.0-rc1)
- Imagefield 6.x-3.0-beta1 (6.x-3.0-rc1)
- ImageAPI 6.x-1.5 (6.x-1.6)
- Imagecache 6.x-2.0-beta8 (6.x-2.0-beta9)
- Lightbox2 6.x-1.9
Update: Modules have been updated to the latest versions as of 20 April 2009, version numbers are in brackets after the links above.
Installation
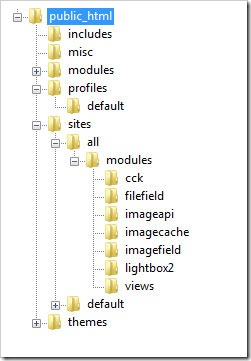
Install Drupal as you normally would and extract each of the modules to the /sites/all/modules directory. You should have a directory structure like the following:
When logged in go to /admin/build/modules and enable the following modules:
- Content
- Filefield
- Imagefield
- ImageAPI
- ImageAPI GD2 (unless your server is configured for Imagemagick, then enable the ImageMagick module instead)
- ImageCache
- ImageCache UI
- Lightbox
- Views
- Views UI
Once you have ticked the modules, press Save configuration.
Imagecache
We need to create 2 presets for our images, one will be a thumbnail to show in the gallery and a second to show within the lightbox.
Navigate to /admin/build/imagecache and click Add new preset.
Set the preset Namespace to thumbnail. Click Add Scale and Crop, set the width to 180 and the height to 120.
Then create a new imagecache preset with the name lightbox. This time select Add Scale and set the width to 800 and the height to 600.
CCK Imagefield
First we will set up a new content type for our images which we will call Image. Navigate to /admin/content/types and click Add content type.
Set the name to Image and the type to image. You may enter a description if you wish.
Under Submission form settings, delete the text from the Body field.
Depending on how you want to set up the gallery, you can change the Workflow settings so that images aren’t automatically added but are added to an approval list, for this tutorial we will make all images published, so untick Promoted to frontpage and leave Published ticked.
Under Comment settings, set comments to disabled.
Save the content type.
Next to the Image content type click manage fields. In the Add New field area, set the label to Image and the field name to image (to make it field_image), for the Type of data to store, select File then for Form element select Image. Press Save.
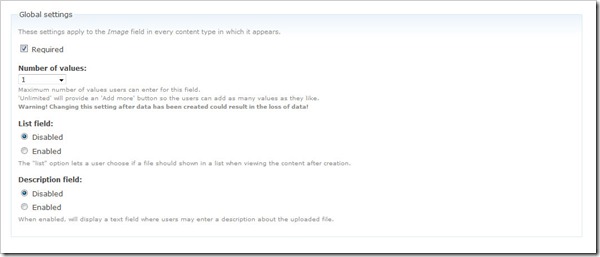
Under Global settings, tick the Required box and set the Number of values to 1. Leave the List field and Description field to Disabled.
Then press the Save field settings button.
Now click the Display fields tab at the top of the page.
Set the Label to Hidden and set both the Teaser and Full node to Lightbox2: thumbnail->lightbox.
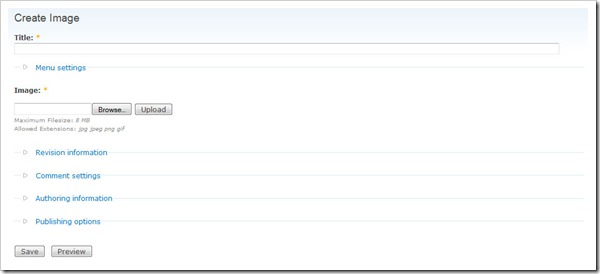
Now under /node/add/image we can add an image to go in to our gallery.
For now create 3 or 4 images.
Under /admin/content/node you should now have some nodes.
Now we will set up a view to display these nodes in a gallery.
Views
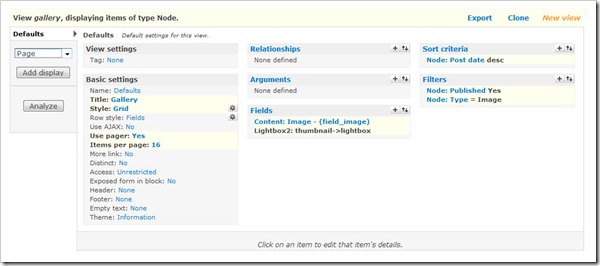
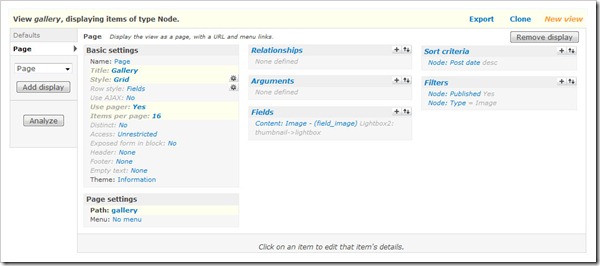
Navigate to /admin/build/views and click the Add tab at the top of the page. Set the view name to something like gallery. Leave View type set to Node.
Set the title to Gallery. For Style set to Grid then chose 4 columns and set Alignment to Horizontal.
For Use pager set to Full pager. Then for Items per page, set to a multiple of 4, I am going to use 16 to give us a 4x4 grid of images. If you wish, you can set Use AJAX to Yes to stop the whole page being loaded on the pager.
Add the following Filters:
- Node: Published = On
- Node: Type = Image
Under Fields select Content: Image (field_image). Set Label to None and change Format to Lightbox2: thumbnail->lightbox.
Under Sort criteria you can set this to what you want. I am going to set them to newest first. Select Node: Post date and set to Descending.
On the left select Page from the drop down and click Add display.
Under Path set to gallery.
Press Save.
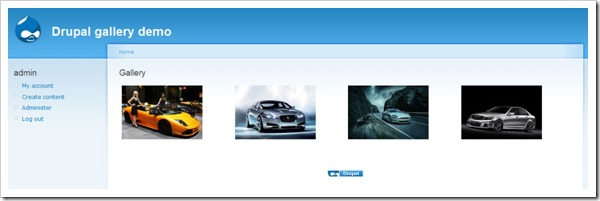
Now if you navigate to /gallery you can see your gallery in action.
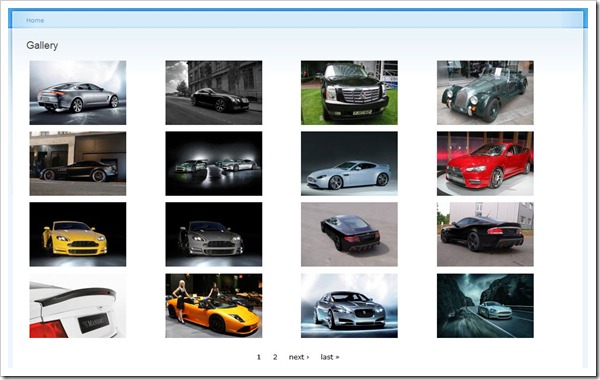
Once you upload more than 16 images which we set our Items per page to, a pager will appear.
Update: There may be cases where the image isn't uploaded to the image type when a user submits the node add form without uploading the image. This will show up as an empty section within the gallery and the node will be submitted with no image, but Imagefield will not tell the user that this is a problem even if it is a required field.
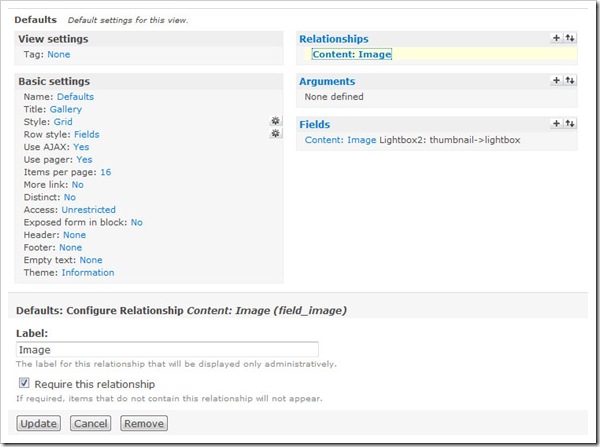
To stop these empty image types showing in the gallery, you will need to add a relationship for the image and set it to a required relationship. This way the image node will not appear in the gallery unless there is an image attached. You could then set up an additional view to find out which image nodes don't have an image attached.




Comments
Macgal
Thu, 2009-06-11 11:58
Permalink
Ok, worked out why it wasn't
Ok, worked out why it wasn't working, thumbnails weren't being loaded into the imagecache directory. Not sure how to fix that (apart from manually loading them in).
Macgal
Thu, 2009-06-11 12:02
Permalink
Nevermind me, all fixed,
Nevermind me, all fixed, thanks for the excellent tutorial.
kaay
Wed, 2009-06-24 15:37
Permalink
I have seen more than twenty
I have seen more than twenty tutorials since last week because i am looking for the gallery solution for my site I don't want to use the gallery modules because most module are still in development phase and some good modules has no support or frozen. anyway this is another good example expalining HOW TO CREATE SIMPLE (single image upload) GALLERY. Looks to me that everyone keen to explain simple way which is most of the time easy too (so don't think we need too many tutorials) but not necessarily effective, but they try to explain multi upload issue in the comment because so many like me want to know. I don't understand why someone is not trying to write a tutorial on multiupaload image gallery. Is it really too complicated? correct me if I am wrong. Thanks
admin
Wed, 2009-06-24 17:20
Permalink
@kaay, Not complicated in
@kaay, Not complicated in the sense that it is near impossible, but complicated enough that a fair few people can't do it easily. When I get some time I will try and write up a multiupload image gallery.
muzzik
Thu, 2009-06-25 11:15
Permalink
Hi, I have one question
Hi,
I have one question regarding a distance between an images in the gallery. In your example http://gallery.jamestombs.co.uk/gallery I see that images have more space surround.
Could you tell me how to do this?
Thanks,
Lukasz
admin
Thu, 2009-06-25 13:11
Permalink
@muzzik, the spacing is down
@muzzik, the spacing is down to the theme and browser. The bigger the screen, the wider the theme gets, the bigger the space around the images.
Create an album...
Thu, 2009-06-25 13:21
Permalink
[...] Category: Development
[...] Category: Development This tutorial is an addition to my previous tutorial on creating a simple gallery in Drupal 6 using CCK and views. This tutorial will enable users to create galleries containing multiple images per node with [...]
Bob_Zee
Sun, 2009-07-19 23:36
Permalink
I'm still having issues with
I'm still having issues with displaying the gallery to anonymous users
I've checked the permissions and all seems to be fine
I can see it logged in as admin
Disabling the Content Permissions Module worked for me too but It would be great to limit the content based upon permissions
Anyone have a fix for this?
Regardless, great job on the tutorial
Thanks!
admin
Mon, 2009-07-20 09:18
Permalink
It may be worth posting an
It may be worth posting an issue on the d.o for the Content Permissions Module to see if there are any issues with compatibility with the View modules.
Rob
Mon, 2009-07-20 13:53
Permalink
Good tutorial. I can't get
Good tutorial.
I can't get my site to display the images. In the source code it pulls from "sites/default/files/imagecache/lightbox/" which is right (I think) but there is no image there.
When uploading it saves the image to "sites/default/files"
Have I missed a setting somewhere?
Cheers
Rob
admin
Mon, 2009-07-20 20:36
Permalink
Is the imagecache directory
Is the imagecache directory writable by the server? Have you looked through the watchdog logs to see if any errors are thrown up?
Rob
Tue, 2009-07-21 09:40
Permalink
Yes I had all the directories
Yes I had all the directories set right - didn't hurt to double check though.
Thanks for the info on the logs, Drupal noobie here so hadn't realised they existed.
Turns out the issue was with the file names (and spaces in them) but it was the logs that pointed me in the right direction.
Cheers for a great tutorial
bcl
Wed, 2009-07-22 16:25
Permalink
I followed this tutorial two
I followed this tutorial two times, but the images upload but don't show up after i press save. They upload to the sites/default/files folder. What am i missing here.
mcdazz
Tue, 2009-07-28 15:29
Permalink
Firstly, thanks for the
Firstly, thanks for the tutorial.
Secondly, I followed the tutorial and also experienced the problem with the thumbnails and images not showing up.
After looking at the html that was outputted, I realised that the thumbnail should have been created under sites/default/files/imagecache/thumbnail and the image should have appeared under sites/default/files/imagecache/lightbox - but they weren't - but then, neither were the two folders.
I checked permissions - they were fine.
I manually created the folders, tried again, and once again, the images weren't created.
The one thing that did work for me, was switching to the Private download method under admin/settings/file-system.
After adding new images, the new images were now being created in the appropriate folders, and now appearing in the gallery.
I'm not entirely sure why the Download method needs to be set to Private, but it now works.
Hopefully, this will help someone else.
Anx
Sun, 2009-08-02 03:05
Permalink
Thanks for the tutorial.
Thanks for the tutorial.
I have two question regarding this image gallery making process.
1. Can you make the tagging feature? I know there is image_annotate as well as footnotes but they use the image module for tagging?
2. How can I make number of comments appear beneath the thumbnails?
thanks a lot.
Duc Tran
Tue, 2009-08-11 03:55
Permalink
I am very new to Drupal and
I am very new to Drupal and the only reason I want to use Drupal is to create image galleries. I found your tutorial and followed it step by step, but didn't get a gallery. Let me be more specific.
I installed Drupal under my domain name, thetranly.com/Drupal
I created a folder named Gallery under Drupal, thetranly.com/Drupal/Gallery
but when I check the result by typing that address into the address input I got the following,
"Forbidden
You don't have permission to access /Drupal/Gallery/ on this server.
Additionally, a 404 Not Found error was encountered while trying to use an ErrorDocument to handle the request.
..."
Did I do something wrong?
Also, would please be more detailed on how to add images under under /node/add/image. I simply put the images title (of course those images are in the Gallery folder).
Please help!
Thanks,
Duc Tran
tim
Tue, 2009-08-11 04:06
Permalink
Same problem as the others.
Same problem as the others. Love the lightbox feature, but the gallery is not visible to anonymous users, which is absolutely essential for my site. How do I create multiple galleries. For example, in my site I need to have a different gallery for each performance.
I really appreciate all of the hard work that went into creating this module and the time to create the tutorial.
admin
Tue, 2009-08-11 09:00
Permalink
@Duc Tran, I think you may
@Duc Tran, I think you may need to read up on Drupal a bit more to see how it works.
@tim, See the tutorial on Creating an album based image gallery in Drupal 6.
Duc Tran
Tue, 2009-08-11 15:04
Permalink
Alright, I realized that I
Alright, I realized that I didn't need to create the folder named Gallery and instead of going to ...Drupal/Gallery I should go to ...Drupal/gallery
There I can see my gallery even though with nothing shown.
Now, I need to learn how to add image. Can anyone help please?
admin
Tue, 2009-08-11 18:42
Permalink
@Duc Tran, Have you followed
@Duc Tran, Have you followed all the steps previously? If so, delete the node/add/image folders if you have created them, then navigate to that path in the browser. You can also follow a video tutorial that gets you the same result at learnbythedrop.
Duc Tran
Tue, 2009-08-11 19:58
Permalink
Yes, I did follow all the
Yes, I did follow all the steps mentioned. However, I am still not sure if I did it correctly when I tried to add images. I simply put the image titles in the Title field (those images are located in the folder "Drupal/sites/default/files/imagecache/lightbox".
admin
Tue, 2009-08-11 21:18
Permalink
@Duc Tran, I take it you are
@Duc Tran, I take it you are uploading the images through Drupal and not manually placing them in the folder.
If you have followed the tutorial the images should be displayed on the gallery page.
Duc Tran
Tue, 2009-08-11 21:32
Permalink
I did both (uploading &
I did both (uploading & manually placing) but still seeing no image shown.
I just went back and checked step by step from the beginning and I didn't miss any step. I even did what the tutorial mentions in the update.
Thanks for your help!
admin
Wed, 2009-08-12 10:09
Permalink
@Duc Tran, It may be worth
@Duc Tran, It may be worth trying what others have suggested and setting your File system within Drupal from public to private.
Are you setting this up on a local machine or a web server?
Duc Tran
Wed, 2009-08-12 14:41
Permalink
Thanks for your help,
Thanks for your help, admin!
I am on a web server. I just changed the File system within Drupal from public to private, however the gallery is still blank.
admin
Wed, 2009-08-12 18:02
Permalink
@Duc Tran, do you have a link
@Duc Tran, do you have a link for the site?
Duc Tran
Wed, 2009-08-12 19:39
Permalink
It is thetranly.com/Drupal
It is thetranly.com/Drupal
admin
Wed, 2009-08-12 19:53
Permalink
@Duc Tran, When you go to
@Duc Tran, When you go to Administer => Content Management => Content (admin/content/node) are your images set to Published?
Duc Tran
Wed, 2009-08-12 21:13
Permalink
Yes, their status is
Yes, their status is published at the beginning.
admin
Wed, 2009-08-12 23:26
Permalink
@Duc Tran, I guess it is
@Duc Tran, I guess it is probably just one erraneous setting which is stopping the images from appearing or possibly a content access module if you have one installed. If you want to set up another user with admin rights to views and content and email the username and password to jtombs@tombscomputers.co.uk I will happily have a look over it for you.
Duc Tran
Thu, 2009-08-13 14:51
Permalink
Thanks, James! I just
Thanks, James! I just deleted everything and plan to start from scratch. If it won't work, I'll let you know. Have a great day!
Duc Tran
Thu, 2009-08-13 22:09
Permalink
Ha, ha! After starting from
Ha, ha! After starting from scratch, I followed the tutorial, "Create an album based image gallery ..." and I got it. I created 2 albums each has 2 images in it. You can see the result here,
"thetranly.com/DDrup/albums"
Thanks a lot for your help!
By the way, I have a question. When we create the preset named "lightbox" we "select Add Scale and set the width to 800 and the height to 600". This works well with landscape (horizontal) images. What if we have some portrait (vertical) ones?
Duc Tran
Thu, 2009-08-13 22:54
Permalink
Also, I noticed that when I
Also, I noticed that when I opened an album its content images were arranged in 1 column only. How can I make it look like the page /DDrup/albums (rows of 3 or 4 images)?
N.B. I just added another album with more than 2 images and some of them are vertical (just to test).
admin
Fri, 2009-08-14 00:07
Permalink
@Duc Tran, Try this tutorial
@Duc Tran, Try this tutorial for creating a grid of images for each album.
As for the vertical images, you can change it to 800x800 if you want to, but you have to remember that some users may have small screen resolutions so you may not want to make it too big. You can play around with those settings until you get it how you want it.
Duc Tran
Fri, 2009-08-14 16:44
Permalink
Thanks, James! I'll play
Thanks, James! I'll play with the suggested tutorial soon.
Duc Tran
Thu, 2009-08-20 17:05
Permalink
Finally, I can the albums
Finally, I can the albums displayed in rows of 3 images (check this link "http://thetranly.com/DDrup/content/bbsp-april-2009").
However, I would like to change the background from white to black. Would you please help?
Thanks,
Duc Tran
admin
Thu, 2009-08-20 17:30
Permalink
@Duc Tran, Look in to
@Duc Tran, Look in to different themes on drupal.org or Google for some. Alternatively, you can enable the colour module, then go to Themes and configure the colours of the Garland theme.
Duc Tran
Thu, 2009-08-20 22:34
Permalink
I've tried 2 different themes
I've tried 2 different themes and none displayed my albums :-(
I've colour module enabled, but whatever I tried to reconfig the Garland the colour didn't change.
I am reading some docs to see what needs to be done.
Thanks!
Dave
Mon, 2009-08-24 02:40
Permalink
First off, thanks for the
First off, thanks for the great tutorial. Second, I couldn't get it to load right at first, the same issue some others were having. The images were going to the wrong place. I started over and found my problem was that I loaded my modules in the original modules folder, I had not created on in sites/all. Once I did that, it worked fins. Thanks again!
Sandeep
Tue, 2009-09-01 15:50
Permalink
Excellent Tutorial... But as
Excellent Tutorial...
But as usual, one problem.. :P
When I tried uploading new Images after the procedure (It worked great ..) , the new images are not being displayed in the lightbox, I can see their thumbnails but when I click on them to open in lightbox, I get an image of a camera with a cross on it ...!! Any suggestions ??
admin
Tue, 2009-09-01 19:27
Permalink
@Sandeep, that will mean that
@Sandeep, that will mean that the link to the lightbox image doesn't work. Try changing the view to thumbnail -> Original and see if that works.
hamzah
Wed, 2009-09-02 16:47
Permalink
thnx for this greet tutorial
thnx for this greet tutorial ,
the problem was when i upload the image i didn't c it ,after search i notice the imagecache doesn't create sub-folder on it when create new preset i dont know why , i was using troubleshooting document on drupal website but doesn't work with me too , finally i found solution that is change the file system and under ' download method ' change from public to private and the imagecache will work and image will show fine
hamzah
Thu, 2009-09-03 01:22
Permalink
hi again , i have 2
hi again , i have 2 question
1.how can i change space between the images ?what code needed to add to css file ?
2.if i create new contant type called it album and upload the images using it , how to create more than one gallery and each gallery contain different images that belong to album type
tnx
admin
Fri, 2009-09-04 12:04
Permalink
@hamzah, #1 the spacing
@hamzah, #1 the spacing between the images will depend on your theme. I suggest you read up on CSS and find out how to do it on your theme. #2 I wrote another tutorial about Creating an album based image gallery in Drupal 6 using CCK and Views which does exactly what you need.
tomator
Sat, 2009-09-05 23:43
Permalink
Thanks for the great
Thanks for the great tutorial! I learned a lot.
I also experienced the problem with the thumbnails and images not showing up.
I found that I enabled the ImageMagick module, but it was not configured on the server. When I changed to ImageAPI GD2 it worked.
Sandeep
Mon, 2009-09-07 13:47
Permalink
@admin: Apparently the
@admin: Apparently the problem was of memory ..when i increased the memory in php.ini , "It works " :)
lestari
Wed, 2009-09-09 15:12
Permalink
it's a great tutorial...i
it's a great tutorial...i followed the steps and i got the gallery...it's great...
but i have one problem here...how to create a menu for the gallery so everyone can access the gallery through that menu...please help me as soon as possible...thx:)
admin
Wed, 2009-09-09 17:17
Permalink
@lestari, In the Views
@lestari, In the Views editing screen, where you set the Page url, you can also set the menu item. Or you can do it on admin/build/menu
vijayan
Thu, 2009-09-10 15:34
Permalink
hi very nice
hi
very nice explanation exactly get the result.
lestari
Fri, 2009-09-11 14:23
Permalink
thx for the reply...;)
thx for the reply...;)
Pages